Forums › Erbium Lasers › General Erbium Discussion › Some principles photographed
- This topic is empty.
-
AuthorPosts
-
Glenn van AsSpectatorHigh folks: Here is a case I did yesterday and thought it showed a few things we have learned here but I thought I would document them to show you some of the things we have discovered about the Er:YAG from tips you have told me and from my own experience.
At the Nash Institute this weekend people were asking me whether it was my experience with using the wavelength or the high mag which has helped me through the learning curve more. I think really it is both but perhaps the ability to see at high mag over the last 5 years has helped me separate so much of the “hype” vs reality of what lasers can and cant do. I am glad that we are beyond the ” my laser cuts faster” and ” my laser doesnt bleed on soft tissue ” debates that raged on for so long in the beginning.
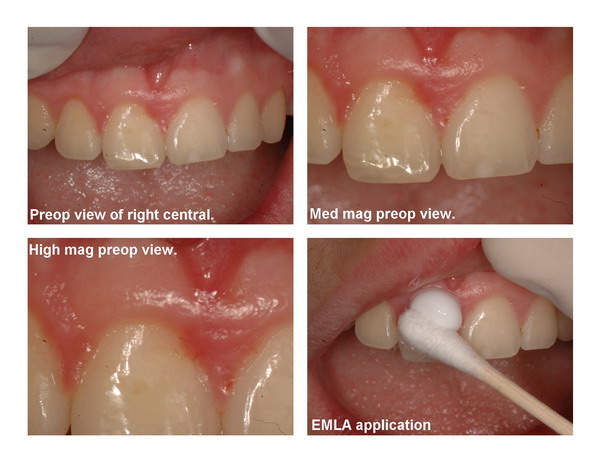
Enough said , here is the case. THis is a young guy of 14 or so who has a groove on the gingiva of his upper right central (#8) that was difficult to show with a photograph because of the location (on the facial plane) but the tissue was always inflamed due to food impaction and the surface rough so we decided to get him in and restore the area with a restoration and some sculpting of the soft tissue in the area to improve access for the preparation.
I used EMLA only for the tissue.
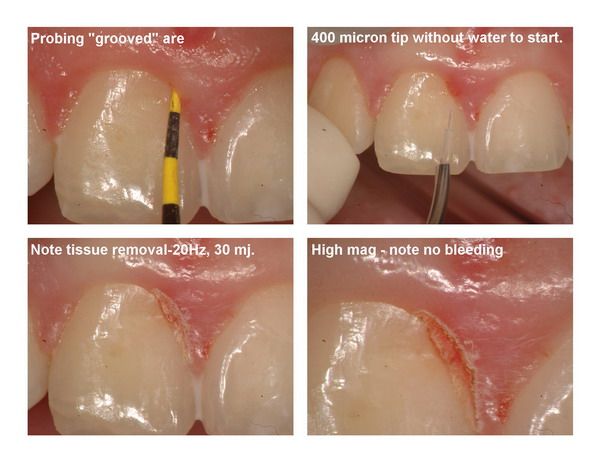
In the beginning we used the DeLight with 20 Hz and around 40 mj without water to remove tissue (note the angle of approach that is possible with this tip design, preventing any iatrogenic notching that happens if you are not parallel to the tooth). This in my opinion is not as easy to do with a handpiece head instead of this design.
I show you that the tissue was peeling away and shaving down.
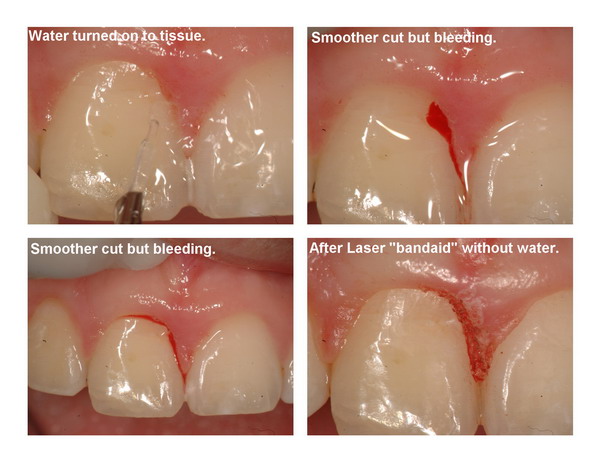
Halfway through for argument sake, I turned the water on with the same settings to get a smoother cut. It will cut smoother with water with less smell but of course there is a side effect…….more bleeding.
After the gingivectomy was done and a “laser bandaid” of 30 hz and 30 mj without water applied to try and stop the bleeding, there was an improvement with only slight “oozing”.
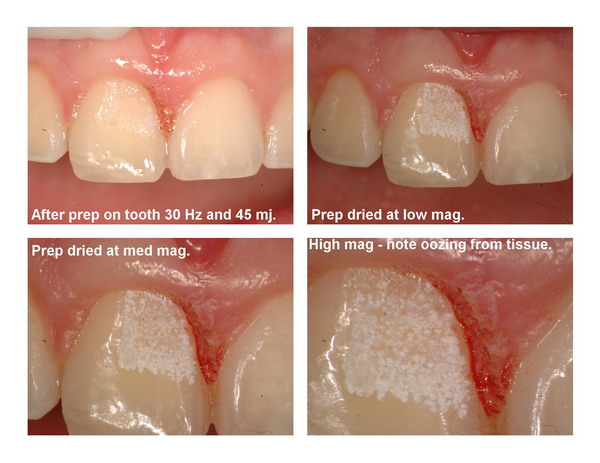
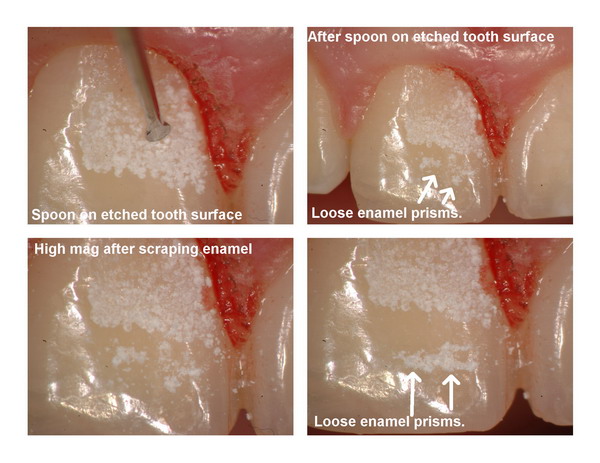
I then turned the erbium onto the tooth at 30 Hz and 45 mj with the water on and a 400 micron tip. When wet there is no etch obvious but dry it out and it looks great. This is only 1.25 watts but you can see that an etch still occurs.
I then used a spoon on the surface to “scrape” the enamel to show you that the etched surface may not be so strong a bonding surface to begin with. Its the “deceiving laser etch”…its chalky but fragile!!
Removing the loose enamel prisms with the spoon scrape gives us a etched surface which is more predictable to bond too.
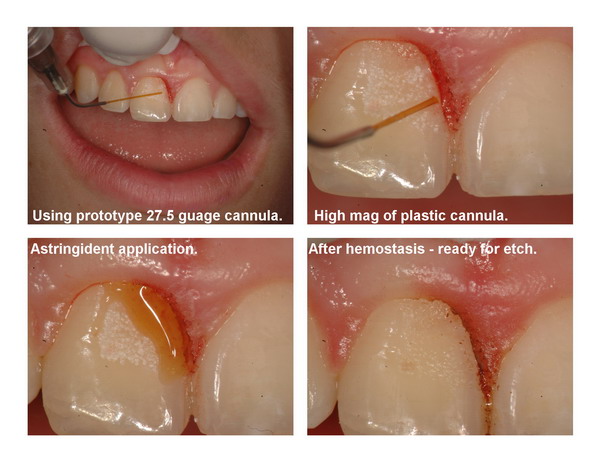
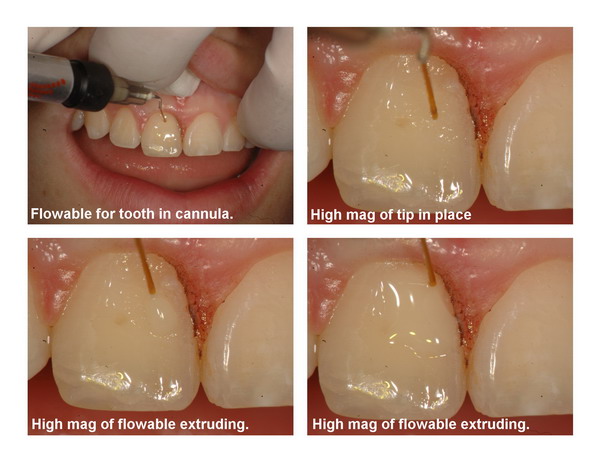
Now speaking of bond the sulcus is “oozing ” from the gingivectomy so we are doing some work with prototype small plastic cannulas that are 26, 27.5 and 30 gauge which attach into metal cannulas that we typically use for etch and liquid dispensing that are much much bigger. With the scope these flexible tips can be used to dispense small increments of flowable or in this case astringident hemostatic solution.
The only negative in this case was that I couldnt rub or burnish it in with the plastic because that initiated bleeding.
After the oozing had been halted, etched, bonded and then applied flowable in the same cannulas with precise placement. These plastic tips are cuttable, they bend (like a straw would) but they are able to dispense the flowables into small preps and minimize air bubbles. For the more viscous flowables a warmer (which we also have) will make the flowable able to be used with the larger cannulas.
Dont ask for how you can get them, they arent available yet but soon will be. I am working on a kit actually with smaller burs and bonding brushes for those using high mag and scopes.
These tips are ideal for small occlusals with 1/8th and 1/16th round burs and of course the “laser fissure sealant preparations”.
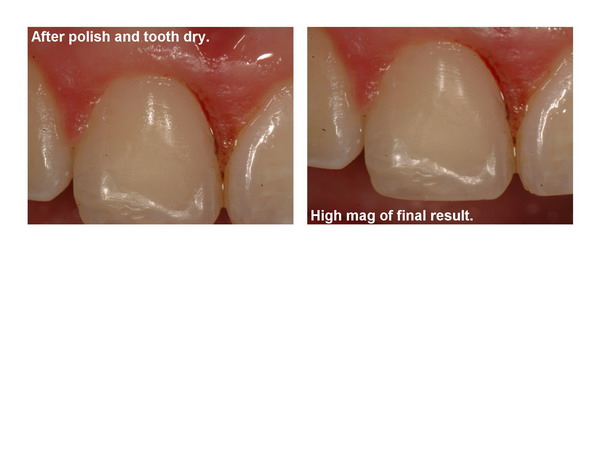
In closing the polish needed to be refined a bit but all in all not a bad result.
I just wanted to show some of the principles we have talked about here and I hope this collage although lengthy, does demonstrate some of the issues we face with lasers.
warmest regards
Glenn

brucesownSpectatorHi Glenn
Interesting case, thanks for sharing. I’ve had my DELight for 6 weeks now. I broke a couple of 600 micron tips in the first two weeks and was a bit gun shy, but am contemplating taking out a brand new 400 micron tip tomorrow. Until I get a feel for these tips, how much would you recommend reducing the power to get equivalent ablation to the 600’s I am becoming used to.
Glenn van AsSpectatorHi Bruce and a hearty welcome to my fellow BCer!!
Congrats on the Delight, and what a great question. Hey first off are you using magnification and if so how much. I will be honest, many times now I use the smaller 400 micron tip for everything. I like the length of it compared to the 600 and also the cutting speed but I will say that at 10X mag (even 6.4X) I have greater control by being able to judge when it is to close to the tooth structure and to avoid accidental breakage by banging into the tooth or using it like a bur.
Remember its non contact in nature!!
It will definitely cut faster than a 600 but it will create more sensitivity at the same settings.
In general I would reduce the mj setting by 1/3.
My adjustments come on the MJ setting so with a case where I was using a 600 micron tip to create a bevel at 30 Hz and 60mj, I may drop to 30 Hz and 40 mj.
For enamel if I was at 25Hz and 240 mj , then I might go to 25Hz and 160 mj (drop it by 80 mj).
I will say that be careful not to drag the tip across enamel and to widen the cavosurface area to get water flow down to the depths of your prep, otherwise you can cut a narrow trough fast with this tip and not enough water will get to the site which leads to charring, pain, and eventually stalling out of the unit as it wont cut.
Hope that helps and if the patient is anesthetized then it is not a problem use them at full settings but be careful dragging the tips.
In addition, I think the best cases are small occlusals (diagnodent readings below 40) and what I do is use the 600 first just to create a little width to the prep and then go in with slightly reduced settings with the 400 micron tip to get into the deeper areas. This is where the tip shines.
I like this tip ALOT but remember that magnification is essential to the longevity of it !!
Glenn
brucesownSpectatorHi Glenn
Thanks for the advice, used the tip extensively today with your guidelines with quite good success. One quick question. I hadn’t known about charing preventing ablation. Are you creating a water poor area in the enamel which is resistant to ablation, or is there some other explaination. Does the area appear charred like charred gingiva would?
Thanks as always for your guidance. I think you have done more for me through your posts here than a year of lectures could.
Cheers from the Island
Glenn van AsSpectatorHi Bruce…….cheers from the mainland.
YOu are bang on with respect to the charring. You will get a beige or slightly darker brown on the dentin if you dont get enough water down into the ablation area, and then it will eventually get black. Take an extracted root and take an old tip and cut a straight channel down into the dentin. You will see what happens…..brown dentin.
I think it is very kind of you to make those remarks but I will tell you that in all honesty it really is just the scope that has given me the ability to make some judgements not based on what I feel, or what I think, but what I see is happening.
I can tell you that I tried alot of different techniques in the beginning and followed the threads here in the beginning. If you want some interesting reading, check out the early threads on this forum.
Its really weird to see how far we have come since the early days.
Hope all is well and again continued success with the 400 micron tip…….its my favorite tip.
With that in mind I use primarily 5 tips
80 degree 600 micron tip
80 degree 400 micron tip
Chisel tip
Soft tissue tip
Endo tip (usually 300 micron)thats basically it…….and of these really only the chisel is the only one I use on the contra angle.
Hope that helps.
Glenn
Dan MelkerSpectatorGlenn,
What makes this procedure so successful was the lack of bleeding and contamination for the restoration to be placed. It would have been difficult to get such a result with any other instrument!
TOTALLY sound BIOLOGIC principles!
Your buddy Danny
Glenn van AsSpectatorHi Danny…thanks. I have learned alot but I still have a long ways to go. I honestly dont say that a bur or cord or anything else is poorer than a laser.
I will tell you an interesting story on really why I post this stuff. I am at the Nash Institute and most people there (last weekend) had the laser for 1 year or less.
They were only doing hard tissue procedures (teeth preps) and none were using the laser for soft tissue, endo or bone.
If you have it and can do a little more with the laser while following biologic principles then great.
Now I will say that there is alot of the esthetic guys who are now using the laser for esthetic cases with alot of bone relief closed flap.
I actually done have that much of a problem for a localized area if you can see it, if the patient is not a periodontal nightmare, if you can feel the bone with the instrument etc.
I think that sometimes its difficult with a laser handpiece to get parallel to the tooth structure to relieve the bone properly and the pen type handpiece does help in this area.
Anyways, I am off to read your PM.
Glenn
Dan MelkerSpectatorGlenn,
There are 2 possible problems with CLFCL that I see.
1. Everyone has a different opinion about the bone and causing or preventing troughing.
2. An area that noone has considered but myself because of the way I do surgery is the CEJ’s. They are so irregular from tooth to tooth (adjacent teeth) How does one correct that problem when they cannot see it?
I have a case where it is both AAE and APE in the anterior. #8 has APE and #9 has AAE.
I have many cases with enamel projections on anterior teeth.
the question is if you have to have a BW which is paraboilc to the CEJ how is that possible with the above circumstances?
As you and I talked, Dave Hornbrook has new tips and is doing CLFCL. I believe I am supposed to get his DVD he made. I hope he is successful because it would be the best for everyone.
Again, if those doing CLFCL could see all the problems that I see with the CEJ’s maybe they would reevaluate the technique. I have absolutely no problem with the laser use on soft tissue and bone just the visiblity factor to correct all the problems.
Again Glenn your work is astounding!
Danny
Dan MelkerSpectatorI” target=”_blank”>http://www.dentaltown.com/gold….8EE
I do not know if this is the appropiate place for this post but the above thread is conventional surgery of AAE with a bur. Those that think I am against the laser should look at my comments on the above thread. Dental Student presented the case and as semms to be the usual case everyone loved it.
But if we look closely there are familar problems:
1. Troughing of the bone on distal buccal of #5 and #6.
2. Too much bone removal for BW
3. WAy too much festoonig of bone. Look at #11 and buccal area. Prominent root and future problems of dehiscence or fenestration.
If that aggressive procedure could be redone with a laser it would have been better off. Too much bone removal is far worse than too little.
Noone can accuse me of being against the use of the laser, just the procedures that are sometimes undertaken.
Truly a great thread to learn from over on DT. Funny the Dental Student picked up on everything and realized what was done wrong!
Thanks,
Danny
Glenn van AsSpectatorDanny, tell me how you suture these cases. I just cant figure out how it is done.
Thanks
Glenn
Dan MelkerSpectatorGlenn,
The suture technique is called the Hollywood suture.
Your first penetration with the needle is through the buccal flap , then through the lingual flap and about 1-2mm back out the buccal flap away from the tip of the papilla. Then tie off the knot. When going through the buccal flap you come from the underneath side and out.
I assume you are talking about the thread above.
I do not suture that way. I like to tack the suture to periosteum which is a whole different technique all together.
However the above technique does work fine if you have tissue that lays back just coronal to the cej. If not then periosteal suturing is better.
Thanks,
Danny
Dan MelkerSpectator<a href="http://www.dentaltown.com/idealbb/view.asp?topicID=30978&forumID=47&catID=36&search=1&searchstring=&sessionID={7B15B26D-B67C-4DA9-A2CA-A02555CE3A47}
Glenn,” target=”_blank”>http://www.dentaltown.com/idealbb….>Glenn,
Anterior case that was really difficult because of of probing up to 10mm. trying to keep papilla height. Notice between 8 and 9 , 2 sutures to keep papilla height. The other case was simple because the palatal tissue was not flapped.
Danny
Glenn van AsSpectatorHi Danny: For the Hollywood suture (and I apologize if this is just very basic stuff) , do you start on the buccal in the papilla or 1-2 mm away. You go through the interproximal space to the palatal and then back through the space and tie out the knot on the buccal.
I was thinking that if you exit on the buccal at the end 1-2mm away from the initial entry level doesnt that pull your flap Upwards a little.
Thanks again for the dumb question , just trying to think how I can improve my next case.
Glenn
Dan MelkerSpectatorHi Danny: For the Hollywood suture (and I apologize if this is just very basic stuff) , do you start on the buccal in the papilla or 1-2 mm away. You go through the interproximal space to the palatal and then back through the space and tie out the knot on the buccal.
GO DOWN ABOUT 3MM. FROM THE TIP OF THE PAPILLA THAT YOU ARE SUTURING. ENTER WITH THE SUTURE FROM THE BUCCAL. PULL THE NEEDLE THROUGH AND THEN ENTER THE LINGUAL PAPILLA FROM THE LABIAL SIDE AND EXIT THE LINGUAL SIDE OF THE PAPILLA. NOW ENTER THE BUCCAL PAPILLA ABOUT 1MM. CORONAL TO WHERE YOUR FIRST SUTURE WENT THROUGH BUT ENTER FROM THE LINGUAL SIDE OF THE FLAP. NOW YOU CAN TIE THE KNOT ON THE BUCCAL. USE 5-0 GUT. VERY IMPORTANT, HOLD THE PAPILLA IN PLACE TO THE LINGUAL PAPILLA FOR ABOUT 30SEC. TO 1MINUTE SO THERE WILL BE NO BLOOD CLOT AND YOU GET CLOSE ADAPTATION OF THE BUCCAL AND LINGUAL FLAPS HELPING TO PREVENT LOSE OF PAPILLA.
HOPE THIS HELPS,
DANNY
brucesownSpectatorHi There;
The hollywood suture you are talking about sounds an awful lot like a vertical mattress suture. You will find that one in the textbooks.
-
AuthorPosts
