Forums › Erbium Lasers › General Erbium Discussion › Endo and the Er:YAG laser
- This topic is empty.
-
AuthorPosts
-
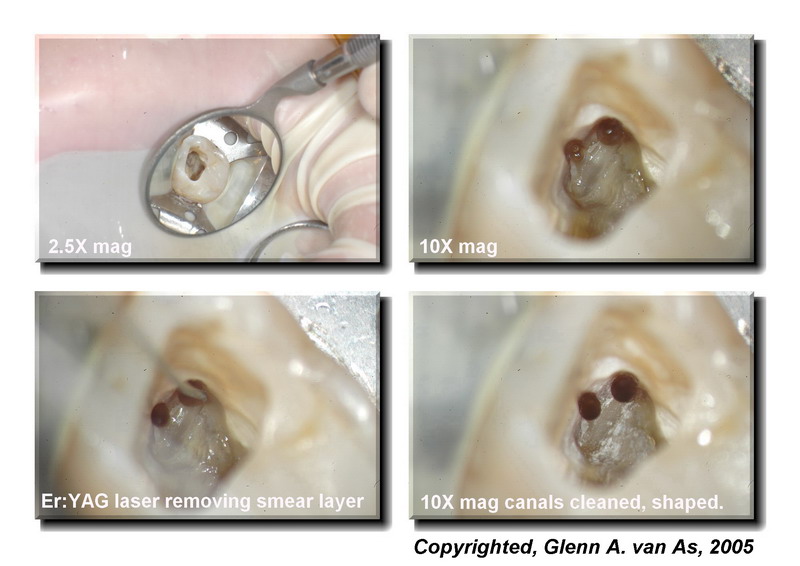
Glenn van AsSpectatorI posted this on the endo forum at DT and thought because of the usage of laser Er:YAG tips right at the end of the procedure to help remove the smear layer and also help disinfect for this one step endo that I would post it here as well. I used the laser at 40Hz and 40 mj on all canals til around 2mm from the end. I wonder if the accessory canals would have opened up if I had used the laser. I was proud of the case, the photos and the documentation so I post it here for you educated folks!!
Grin
Cya
Glenn
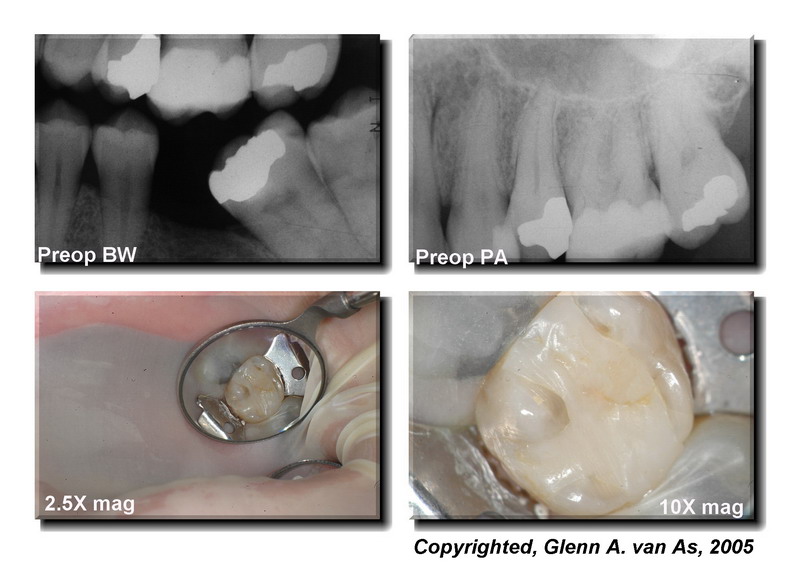
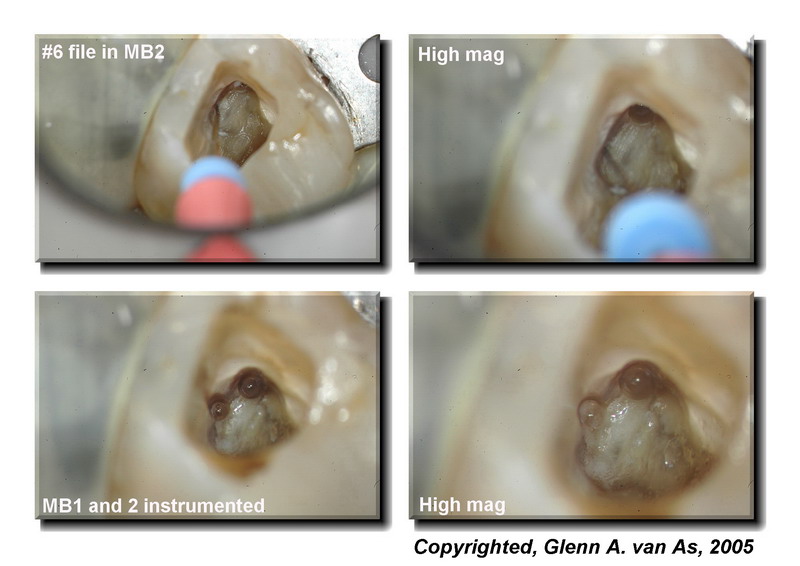
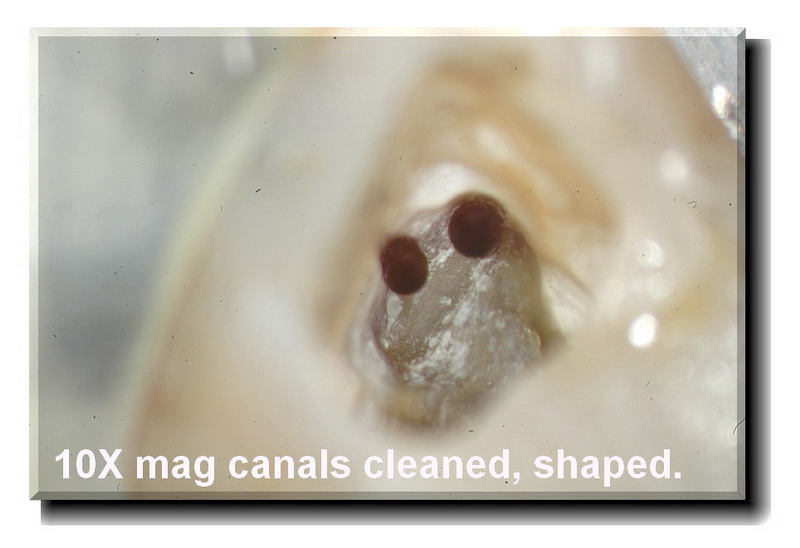
Hi folks: so often I read about not finding MB2s in upper molars or not knowing where to look or how to uncover them. I had a light day yesterday so I had a chance to fully document this case for you. Hopefully it helps to not only show where the MB2 is located, the angle it initially takes but also what the microscope can show for endo at high mag.
This was a 45 year old lady who has had intermittent lingering pain to cold and spontaneous pain on upper left 2nd molar with large resin in place.
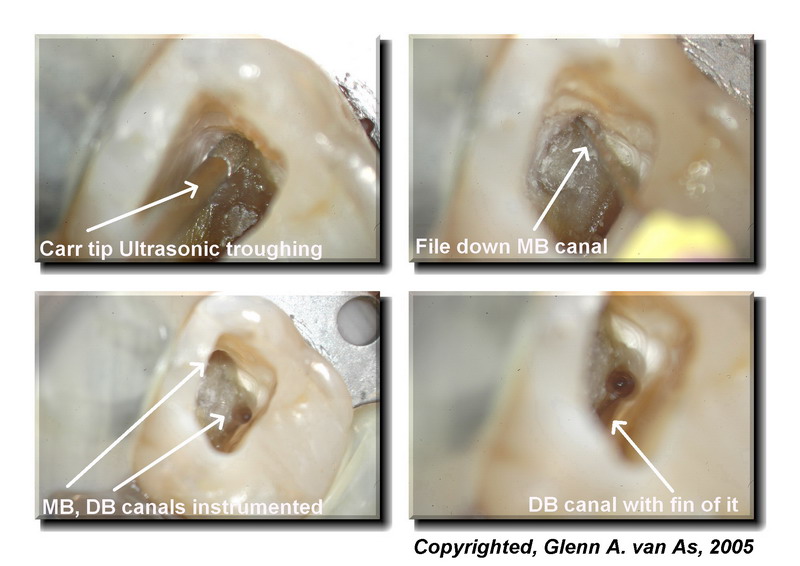
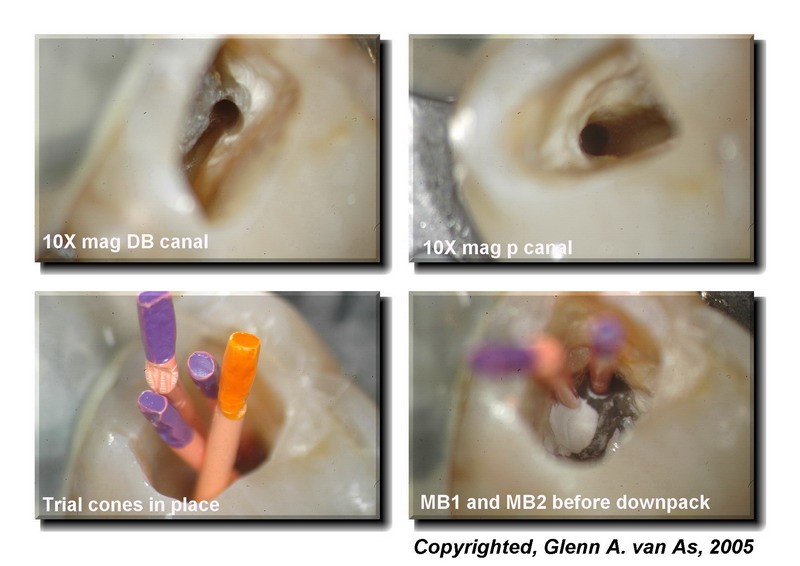
I opened the tooth and found DB and Pal canals to be vital and easy to find because of bleeding. MB1 and MB2 were non vital and not easy to see at all.
I used an Ultrasonic tip to uncover the MB1 canal which was not on the same plane as the DB canal (Not a straight triangle) and so I assumed that there would be an MB2. The tip used is called the Carr Killer Ultrasonic tip (http://www.eie2.com) and it was in the EMS mini endo unit.Now to look for the MB2 canal I placed water on the floor of the pulp chamber and quite often you get a chance to read the dentin map which is subtle shades of the pulpal floor that allow you to see where the canal may be. Typically it involves shades of grey that lead to the canals. In this case something was visible but not clear. Next thing to do is trough 2-3mm down following the dentin map and have another look. There was the tell tale white line (tissue ) between the uncovered MB1 and the position where the MB2 would be which is Mesial to a line drawn between the MB and Palatal so almost always you have to remove some of the mesial wall of your access. Its interesting to note how I had to trough 3mm down to get a good view, and also note the angle that the MB2 initally is entered at, USUALLY MESIAL AND LINGUAL to that of the MB1.
My file system which really is unimportant is that I use K3 VTVT (alternating between 06 and 04 tapers changing the tip size each file as well so its called variable tip and variable taper). This has been shown by John McSpadden to reduce file breakage. Typical sequence is
Hand file 06- 20 to apex with Glyde
.12 , .10,. .08 tapered coronal shapers (17mm length) to open coronal 1/2
.04 #40
.06 #35
.04 #30
.06 #25
.04 #20
.)6 #15 (if needed)Then taper back from there to gauge the apex with a file.
In this case MB1, MB2, and DB canals filled with 04 #35-#40 tips cut specifically with a gauge
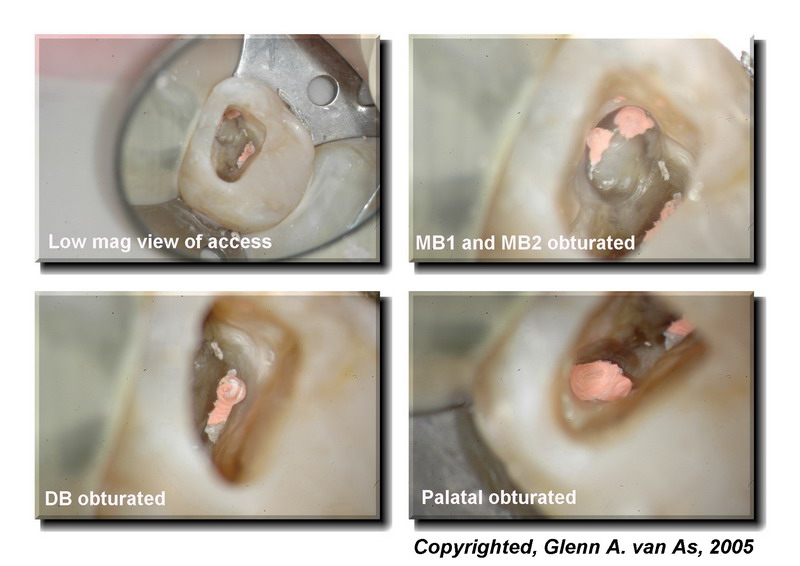
Palatal canal 06 35 tipEWT sealer, System B downpack and Obtura backfill to obturate.
Note the nice accessory canals in the apical third on the DB and Palatal canals.
Time to complete case….7.5 mins including photos………
Nah just kidding yah…….90 mins.
I hope that you find this interesting and this is pretty standard for me to find a 4th canal in a molar both maxillary and mandibular.first and second molars.
Have a nice weekend
Glenn





whitertthSpectatorThe case and technique is absolutely beautiful…I hope you charged enough…
All the best!!
Glenn van AsSpectatorHi Ron….thanks alot. As a GP I am proud of the endo we do, but not all turn out this nice. I know that the endo guy I use here in my area does beautiful work like this all the time. My associate also is doing beautiful endo.
I just wanted to show what is possible now with the scope, photography and the laser thrown in for educational part. In charging it took me 90 mins including 80-90 photos and I charge around 150 above the fee guide which is around 650 here so my fee was around 800 I think.
Cya and thanks
Glenn
Nick LuizziSpectatorHi Glenn–awesome endo. I shuddder to think how many MB-2 canals I missed prior to using a scope. With regard to the er:yag endo tip and the scope-are you observing any cloudyness in the water inside the canals as you withdraw the laser-tip? Do you see any particulate matter in the water as you give a final flush of the canals?
I attended the endo lectures at the ALD meeting and I am very motivated to start using the endo tips in the final step prior to filling. Really nice work Glenn. best regards, Nick
Glenn van AsSpectatorHey Nick….it was great seeing you at the ALD and thanks for the kind words.
I find that there is ALOT of tissue debris coming up out of the canals with the final flush. Its also interesting to see the cleanliness of the canals afterwards , they look like glass. If you are too close then sometimes you find that the canals start to ooze (blood) but thats only if you get too close to the apex.
As a final step towards endo, I think the er:yag is a great idea and it will be a great adjunct for those using Resilon and Epiphany or any resin sealer.
Glenn
ASISpectatorHey Glenn,
I am really disappointed in how it took you 90 minutes to do this. Pull up your socks, man!
Just jiving you…. Very impressive!!! I particularly like that pic of the MB1 and MB2 with the white line running between them.
Glenn, you keep raising the bar. Thanks for doing that as you continue to inspire me.
Regards,
Andrew
BNelsonSpectatorHi Glenn
That is a really nice case and your photos are fantastic. Thanks for sharing. -
AuthorPosts
