Forums › Erbium Lasers › General Erbium Discussion › A simple Class 4 and recontouring
- This topic is empty.
-
AuthorPosts
-
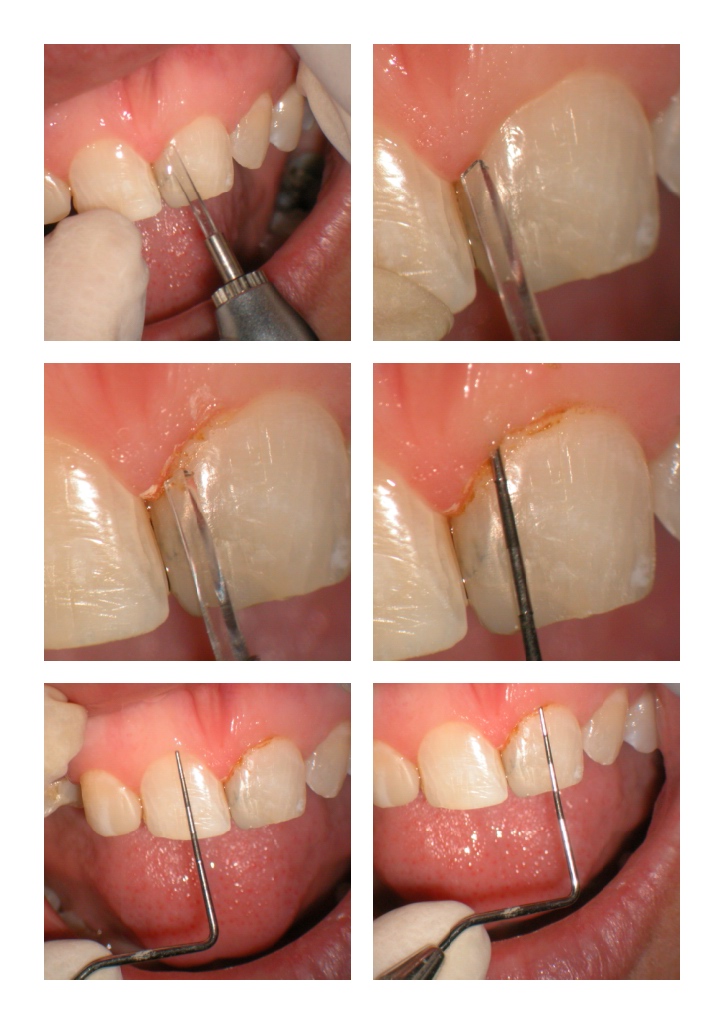
Glenn van AsSpectatorHi there folks: this lady isnt the easiest to work on or deal with but here is her case.
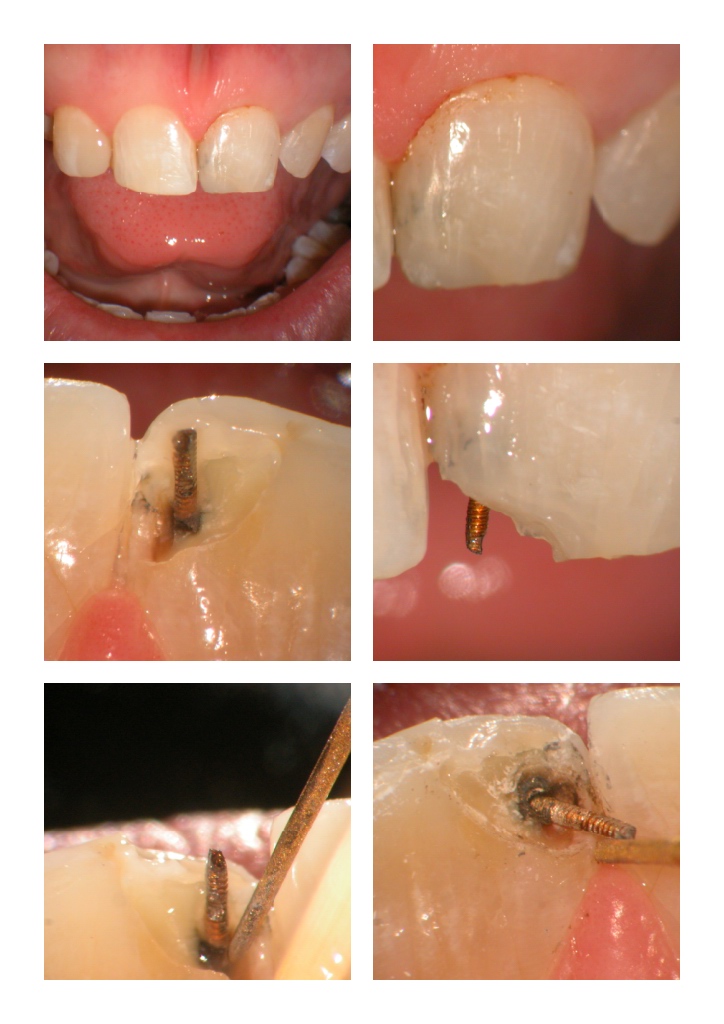
She finished ortho which is amazing because she is a gagger. I planned to do this tooth (upper left central with staining on facial) and rebuild the left lateral to look like the right (its a canine) before she goes for implants. I ran out of time on the lateral but will finish it next time. Just did the central today.
I couldnt put the rubber dam on so did the best I could controlling the moisture.
First thing I noticed about this case was the Gingival Height of Contours weren’t symmetrical for both centrals.
Probing showed 4 mm of attached (didnt sound to bone) and I only needed a mm or so.
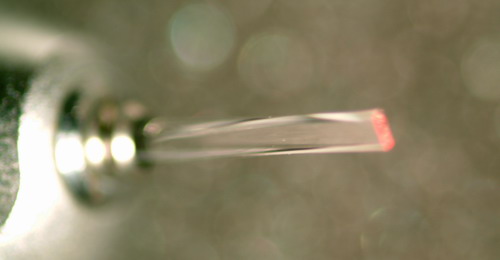
I placed anesthetic with .25 carps of Ultracaine and used the chisel tip at 30 Hz and 60 mj with very little water to cut the tissue. The chisel tip is unique in that it has a bigger footprint but it is more difficult to manipulate than an 80 degree tip but it does plane the tissue better, but differently.
I then turned my attention to the large class 4 resin with staining (the old pin). I got the restoration out with a bur, and then used the spartan ultrasonic to back the pin out……lots of decay beneath the pin causing the greyness on the tooth. I then etched the surface of the tooth (buccal) with 30 hz and 50 mj and you can see you still get unstable enamel prisms which need removal with a spoon. Next time I will etch with under a watt and I still think its unstable so I am removing all the loose enamel on my bevels now.
Used the laser to sterilize deep in the prep for the bacteria in the base of the prep and then used Gradia A2 to fill it up.
Hope you like it……..no words for the photos……….to tired this morning but you get the idea.
Cya
Glenn


drnewittSpectatorNice work Glen
That comp blends in really well and the gingival contour looks great post op. I have not had a chance to use the chisel tip yet but from your pics it looks like you get a bit smoother result than using the 80 degree. true?
Glenn van AsSpectatorGood question Paul………I think it may. That may also be the settings (if you use too high a setting with the 600 or 400 micron tip you will get more of a ragged look).
The bigger footprint may give you a smoother cut. I think you are right.
Thanks for the compliment. See I learned something!!
Glenn
2thlaserSpectatorGlenn,
Nice. You are right, the larger the footprint, the smoother the cut, due to the fact the energy is less concentrated, and not as “violent” when it ablates. The Waterlase chisel tips are a bit smaller, but still a larger footprint, and is excellent for soft tissue. I originally thought it might help with bulk reduction of enamel for hard tissue, but it is way too slow, and inefficient for that purpose in my hands….Mark
2thlaserSpectator
The C-3 chisel tip for the Waterlase.
Mark
Glenn van AsSpectatorThanks Mark…..yes I like the chisel tip for recontouring, for doing ovate pontics it is awesome and for using on bone recontouring.
I havent used it for anything else. I just wanted to show some pics for some stuff I had done recently.
Your point about less violent ablation is true. You can up the settings to get more of a cut, because the power density will drop with these bigger footprints.
The chisel tip also can be used to cut flaps but it ablates a bigger area and so it means it is more difficult to reapproximate the tissues at the end.
Just another thought. This chisel tip is neat because it can swivel around and be positioned for the exact angle you want to approach the tissue. It is long and therefore fragile, and in addition I really like it in the contra angle handpiece, as this is one thing that doesnt work well with the straight handpiece.
You know what is weird is so often I post stuff, throw it up and you guys start noticing stuff, which makes me think and then all of a sudden I realize consciously something I was doing or need to do from your comments.
i actually learn alot from all the great comments I hear here, and I think what helps you all with your comments is the magnified nature of the pics, as we can all comment on what we see……..
It really does help to have it at 10X power for the photos, doesnt it.
Glenn
PS I am going to post a case that I did the other day for an endo.
There is little of erbium in it but what I did find (but didnt take pics) is that the erbium endo tip is excellent for removing CaOh if you use it as an intra appointment medication. Its tenacious stuff and tough to get out of the canals but the erbium endo tip does a pretty good job of flushing it out.
Glenn
Glenn
drnewittSpectatorSpeaking of recontouring. I have had a few cases lately that have been similar in that there is a stand alone molar with a lot of tissue bulk around it. For example a 1st molar with the 2nd bi gone or a 2nd molar with a 1st gone. even on the radiograph of these teeth you can see the tissue being about 5-6mm deep. It is usually associated with supereruption also.
It seems like a perfect job for the chisel. Im sure you have had experiences with this kind of bulk tissue removal. Have you noticed the tissue rebunding around such cases?
whitertthSpectatorNice stuff Glenn as always!!!
The chisel tip is great for debulking papill as wqell as in a mouth breather or medication induced gingival overgrowth….It is also nice around the neck of the tooth to give u the nice C shape of the gingiva as it can be positoned as Glenn mentioned in whatever fashion necessary….
Great Stuff !!!
BenchwmerSpectatorL’Ase,
Wonderful case. Treatment selection worked out great, photos show all.
Why not use Microabrasion to remove the white opaque enamel layer? If you are going to do this awesome kind of work and show it at this magnification you need to treat the remaining enamel with more that an excavator. Your case photos have made me go to air abrasion as my final step in my anterior composites.
Even of you only buy a 赨 Parkell self-contained unit that hooks w/ quick disconnects to the operatory compressed air, you would use it on composite repairs, removing stained (amalgam) enamel, definirely removing this white lazed enamel.
Your photos made me add this extra step, the actual air abrasion would be on the tooth 2 seconds. You’ll see the difference, no more white line to worry about.
Sorry to suggest more tech equipment.
Thanks for the cases.
Jeff
Glenn van AsSpectatorHi there Ron and Jeff: Thanks for the kind words.
Ron, congrats on getting your facility up and running. Is the video networking through a scope or did you go another route. I wish I was out in your area because I would love to see it!!
The chisel tip will debulk papilla and can often be used in cases like orthodontic overgrowth or gingival hyperplasia due to meds. The issue can be hemostasis though particularly if the papillae are inflamed to befin with .
Anywhere that you need to “shave” or “plane” the tissue away , then the chisel tip can be extremely effective.
Good point Ron about this and also the C shape around teeth. ITs pretty easy to do this and many patients can stand it better than a diode (at 10Hz and 800 mj) I can use the diode on most without anesthetic but that is another question but its great for troughing with a 400 micron tip.
Jeff: Man your thinking is always so detailed. I think microabrasion (air abrasion) would work great on this enamel area as well. I think it might be perfect for this. My concern is using AA with the scope (it clogs up the fans on the Xenon lamp and this kills bulbs).
Andrew also uses the AA on his preps. I think if you limit it to two secs that would be awesome.
Jeff that is what I love about this board, we are all thinking out of the box and pushing the thought process of how to use the lasers to new heights.
Great discussion here , and your idea has alot of validity, but its kinda neat to see how the spoon actually breaks of all those loose rods.
I remember Graeme Milicich telling us about this a while back so I give him full credit for making me think about the bond strength of our bevels and when I did the microleakage studies I began to realize that there were HUGE variations in both in the literature.
WHY?
1. THe energy levels are very different in the studies and the higher the energy the more loose prisms and ablation filled craters there are on the tooth.
2. Nobody in the literature has compared the bond strengths after scraping the enamel or AA, with untouched enamel at low, mediuim and high energies.
If they did they would see that there probably will be better bond strength on the low level energy lased enamel that is AA or scraped and that there is better microleakage resistance in my humble opinion.
Great thread
Glenn
BenchwmerSpectatorL’Ase,
I’ve been using AA for over ten years, never any damage to PAC lights, curing lights, loupes, lasers, nothing.
I have an Oreck clean air machine (the vacumn cleaner company) runs all the time in entrance way to my operatories, I let it run Quiet daytime, Max. at night. Use Assistant w/ hi volume suction tip right on tooth during AA. For this type of finishing, the suction tip would control excape into the Operatory. Use 50micron vs. 27 micron powder if you want even less powder spray.
Let me know, before I buy that new Scope.
Jeff
Glenn van AsSpectatorHI there: I havent had any experience with AA other than my little Parkell 200 dollar unit for castings.
Sounds like you have really worked to get the dust down. That should be good enough. A friend of mine Rick Wright uses AA all the time.
I think Andrew Shearon does as well (ASI) , and maybe he can give us some feedback on AA with the scope.
Glenn
dkimmelSpectatorGlenn, great case. Couple things come to mind. The idea about AA to remove the white fuss sounds great. I don’t know about you but if I put one more thing in my op it will explode. Marks spoons work great as do chisels.
When you talk about bonding studies, I remember the kid who did his presentation at the ALD this year. He went on to present at the IADR. I asked him about the loose enamel present after albation. He noticed it but did not remove it. He also used very high MJ. Really ashame that researchers and wet fingered dentist can not get together.
This case is a great example of a case that could not be done with the blade or electro sx. One happy patient.
Ok, don’t shoot me. I learned this from Miguel so I am passing it on. Girdia is great stuff. The problem is you are too translucent. Part of this may be due to the pictures but it is a common problem. In the Girdia kit there is the OA shades. I’ll try to find the link to Miguels case for you. What you do first is place the OA shade and taper it into your margin. The OA shades are opaque and give the same optical affect that dentin does. ( Close enough). You can also frame in with some of the Trans shades or place an opaque border, then overlay with the A shade. Cool stuff.
Here is another similar case. This was with the Waterlase 1.25W. 60A, 20w using TAC only.


The photo on the left is 48hrs post op and the right is the day of treatment.
DAvid
(Edited by dkimmel at 7:25 pm on June 6, 2004)
(Edited by dkimmel at 1:01 pm on June 7, 2004)
dkimmelSpectatorHere is the link to Miguel technique.
<a href="http://www.dentaltown.com/gold/case.asp?MemberType=Gold&id=725&shopperid=61D1E5DB40355D788EECDC6F0D40B3ECDavid” target=”_blank”>http://www.dentaltown.com/gold….p>David
Ok so shoot me already.
Glenn van AsSpectatorYou know what David……I am just about done with DT for a while……I will let others fight the battle.
Its nice to hang out where people give you a chance.
I dont mind skepticism but I have more battles on my hands than to educate the naysayers…..I leave that to Bob and others.
You ever wonder why people stop posting?
Its the people in Glass houses that do it to you……
Thanks for the post…….your results are wonderful. I love the tints and what a great result.
How did you restore the left lateral (wasnt it missing?)
I read all of Mike Melkers beautiful post on DT, it was gorgeous and I like his split dam.
How does he clamp it …..on the premolars.
Does he anesthetize that far back on both sides to get it on??
Glenn
PS thanks for the constructive criticism……I always can learn and agree with you.
I heard Newton Fahl once talk about bonding like this.
Wow , I noticed Mikes fees ……….1400 for two teeth. That is what I almost get for two crowns (around 1500).
I am not sure if that is justifiable for the longevity of the case.
I wonder what two veneers would have been (less in my practice but obvioiusly not his)
The dentistry is beautiful and I learnt alot.
Thanks for the post.
Glenn
-
AuthorPosts
