Forums › Laser Treatment Tips and Techniques › Hard Tissue Procedures › Osseous Recontouring again
- This topic is empty.
-
AuthorPosts
-
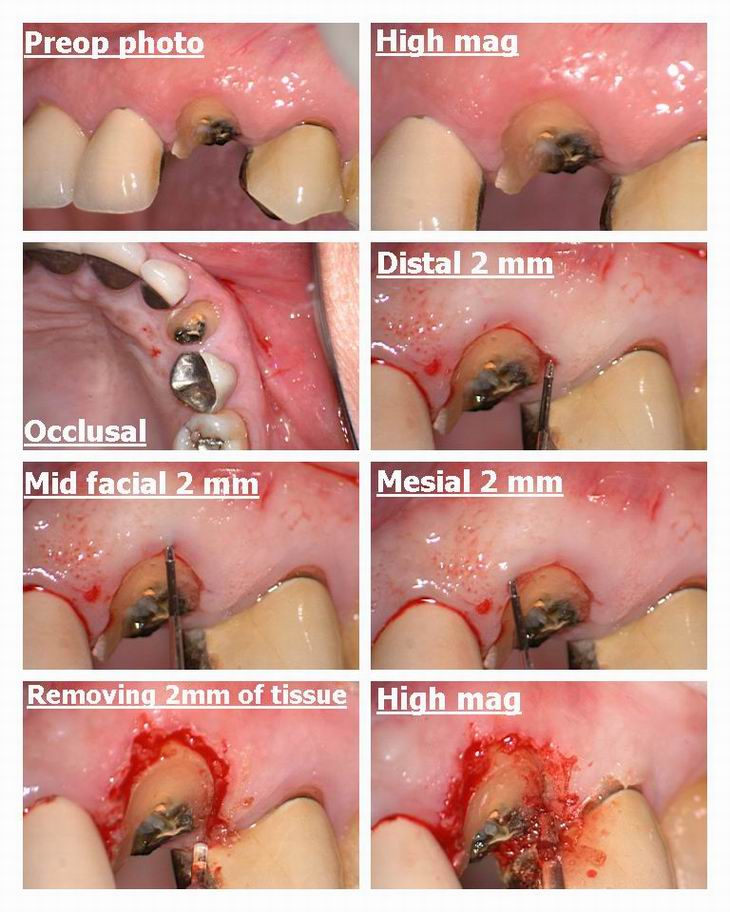
Glenn van AsSpectatorHi folks: Well I did this osseous case yesterday and made a few mistakes, one of which I didnt realize til the patient left and I looked at the photos.
FIrst off, this lady is 75 years old and fractured a canine crown off at the gingiva . THe lateral has a crown as does the premolar.
I had not met the lady but my associate had seen her and rightly decided that there wasnt enough tooth structure remaining to replace the crown but with osseous recontouring we would create enough.
Alternatives could have included an extraction of the root and 3 unit bridge or implant. Positives of trying to retain the tooth included better flossing than a bridge and less cost and time than an implant. Others may have chosen one of the other treatment plans.
I had another colleague in watching the procedure so I was a little distracted when doing this but all the same here are the results.
First off I know that the canine will be longer than the other teeth at the gingiva and in addition that there will be recession on the adjacent crowns.
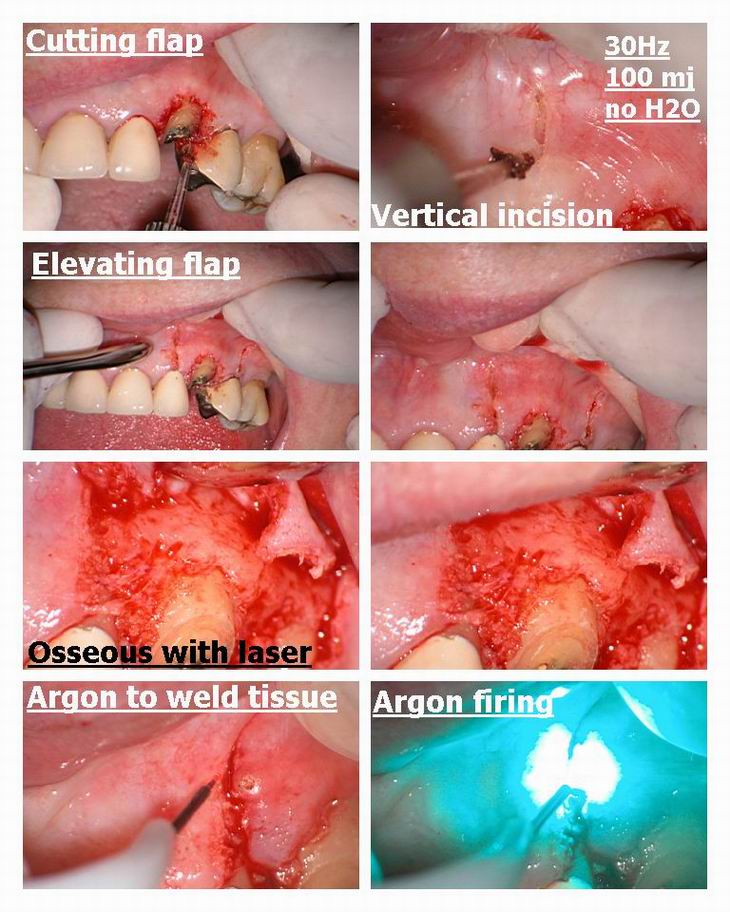
I used a 80 degree tip to remove some tissue first so the flap wouldnt go back to where it was before. I used 30 Hz and 100 mj for the soft tissue.
Then we elevated the flap. I had broken my chisel tip (large tears flowing now) the day before so I had to use the soft tissue tip (pointed ) to cut the flap and releasing incisions. The flap was raised and at this point I forgot to take a bunch of photos, but the final photo shows the bone removed and the flap replaced. For bone I used 30 Hz and 160 mj with water and a 80 degree 600 micron tip.
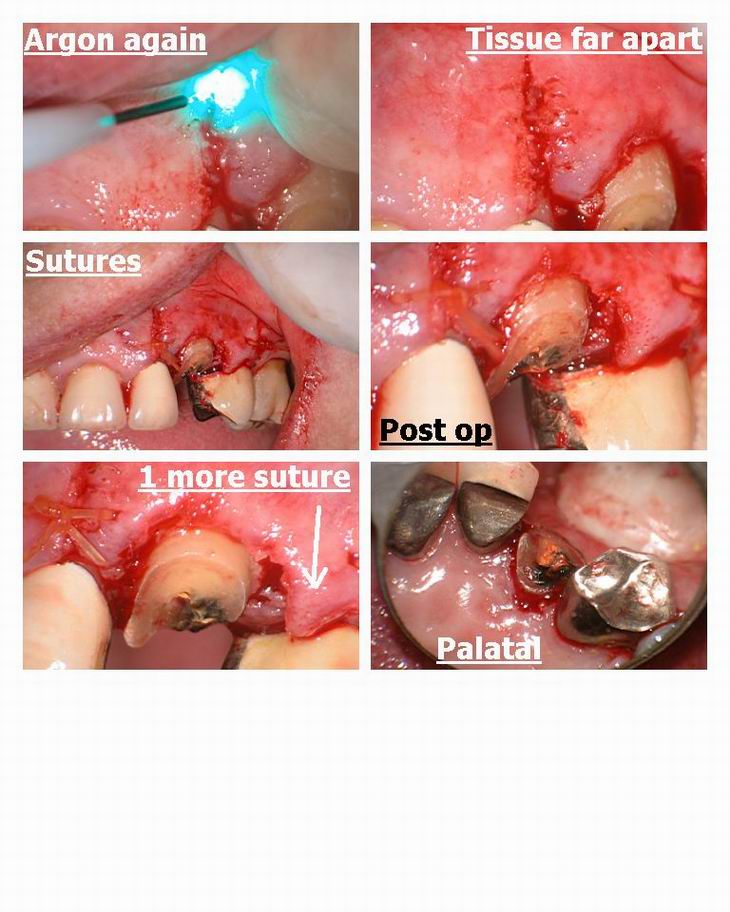
I tried to use the Argon to tissue weld but the tissue was too wide apart and it couldnt be reapproximated. I wonder whether its the tip that cuts a cleaner flap or settings I used.
Anyways I should have placed one more suture in the tissue but didnt see it til afterwards so I hope it will heal.
LIke I said , some you win, some you dont , and I think I could have done a better job with this one but time will tell.
Fire away with suggestions as I am trying to improve my technique. I want to get some smaller instruments and smaller suture as well……….it looks horrible under the scope, reminds me of tug of war rope.
Cya
Glenn
dkimmelSpectatorGlenn,
Couple of questions and thoughts.
What is her lip line like?
Some of what I see maybe because of the photos. One concern I have is if you have enough reduction. You will end up with about 2mm of tooth to work with when this is healed. For a canine this is pushing it. I understand esthetics would be compromised more by being more aggressive. The interprox reduction looks even less.
Another concern is the placement of your releasing incision. Generally I prefer to go to the line angles to release as you get more recession if you relieve over a root prominence.
On restoring I would make sure she was in group function on that side and was given an NTI or the splint of your choice. Unless trama was the cuse of the fracture, I would be very concerned about a parafunctional activityOn your posting of photos, did you upload each individualy or as a colllage? What is your file size for the images?
Great posting!
David(Edited by dkimmel at 4:07 pm on July 19, 2003)
AnonymousGuestGlenn,
Like David, I also usually do my incision a little differently. I’d split the papilla between 9/10 and also 10/11 and angle outward as I went more cervically(apically?) so the base of the flap is wider than the top.This keeps the flap with a very good vascular supply. You also then have the choice of suturing across the labial as you did or going interproximally. I think this way, recession on the adjacent teeth shouldn’t be much of a concern.
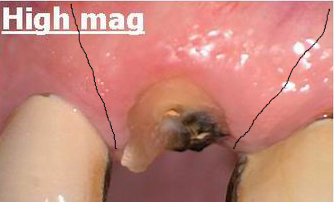
You definitely had some tough choices regarding esthetics and ginigval levels. I’m guessing since the tooth fractured and there appears that there used to be a pretty large restoration, that the canal was pretty calcified,pt age, and endo /post/core (with the crown lengthening) wasn’t a good option?
Wouldn’t we all have a chance at being master dentists if we could see and discuss the things we see in everyone’s post pictures, before we actually did the procedures?

Thanks for posting, Glenn- I know that after 20 years I find its easy to find myself running on auto-pilot in the office and due to your generosity in sharing, I know that there will be so much more for me to consciously think about before tackling the next fractured tooth that walks in my office.
vinceSpectatorHi Glen,
Great case as per usual.
I concur with David and Ron regarding the position of the vertical incisions and the amount of osseous reduction, especially at the line angles. I assume that the palate had enough BW.
Awesome pictures and very innovative regarding tissue welding, do you know how to with the 980 diode? I assume its tough to remain in that temp window to allow this. I have never seen/used a ‘chisel’ tip. How does that work?Best regards,
ASISpectatorHi Glenn,
My concerns echo those of the others:
1. Position of vertical incisions ought to be closer interproximally to avoid gingival recession tendency upon healing. Sometimes if one interproximal aspect requires less osseous relief, I will even just do one vertical incision to minimize recession and to keep the site as noninvasive as possible. It would be ideal if the mesial aspect is not disturbed if I had the choice.
2. Insufficient osseous relief of the canine
What is the suture size used? Material?
I applaud you for showing and sharing your case. Not many will with the gall and the balls to exhibit their less than perfect treatment for all to see. I tip my hat to you. This is one of the many qualities that I admire about you.
Andrew
Glenn van AsSpectatorOk guess I goofed up with this one more than I thought…..
I am trying to improve my technique and now I hope for another one.
Quick answers for you
David..I couldnt see the gingiva when she smiled thank god….had a hard time holding her lip up for the surgery.
I see that from other people that they feel I inadequately reduced the tooth, perhaps. I would love to see other peoples cases shown here as it would sure help with understanding how to do it better but it doesnt seem like alot of cases have been posted here.Incision lines were made in error it seems. Will note it for next time.
Sutures were 3.0 gut……to much for the scope. Need smaller ones.
Thanks Ron……..your post was nicely worded. I must admit like I goofed up pretty good….makes me want to hold of posting for a while and let some others show their great cases.
As for the palatal I just did it closed. I will get her back and redo the interproximal closed flap if needed.
In addition if it doesnt heal well we will do a bridge and eliminate the recession on the two adjacent teeth.
One problem with a mini flap like we discussd is that the flap can easily tear .
Anyways , I am signed up for a crown lengthening course and will see what they say about flap design
Not a laser course but I know the laser will just remove the bur out of the equation.
Gonna take a few days off from the forum…NEED a break.
Hope to see lots of others posting when I get back in a little while.
cheers
Glenn
It makes you realize closed flap cases leave you less room for criticism.
dkimmelSpectatorGlenn, Ron’s form is great. It is just like having the bunch of us setting around critiquing cases and sharing knowledge. The Mastermind concept but over the net. The only problem is critiquing often appears to be criticism. It is one of the short falls of this means of communication. I would like to assure you that my comments about this case or anyones cases are not meant to be a criticism of the case. I also do not see anyone on this form that has that distructive nature ( unlike DT)!
Critiquing our cases pushes us to the next level ,improves our skills and opens our minds to other techniques. So do not stop postings cases or just posting the ideal cases.David
ASISpectatorHi Glenn,
I look forward and learn so much and enjoy all your posts. I cannot agree with David more.
Andrew
Kenneth LukSpectatorHi Glenn,
What you have done and shown us gives us much to think about and learn from.
I’ll certainly post some below par treatments for advices and comments.
As the anthem of the Liverpool Football Club ( soccer ) in UK sings ” You’ll never walk alone”.
Ken
dkimmelSpectatorGlenn,
I am setting at home on the couch after reviewing Ron’s web site and I noticed that no cases have been posted since you’ve taken a time out. I am thinking I really should drive down to the office and see if I have something to post. Got to give you some break. Well I couldn’t remember if I had anything worth posting so I turned on the tube instead. Ten minutes later I get a call. Fractured off #21 at the gum line and she is in panic mode. So now I have something to post!!!
I want to get the excuses out of the way from the start.
1. This is after-hours and I am working alone. Have not done that in years!
2. I did not take as many photos’ as I would have liked. Again sort of tough to do by your self. Plus she has a 4 mo kid with her.I did numb the patient as she is blond and 40 Y/O and is always tough to work on.
You have to trust me on the perio probe. I did use it. Just can not hold it, retract and take the photo all at the same time. The pocketing was 1mm all the way around. I took off a tad more then 2mm of gingival all the way around. 2.75 W 55w/65a. This did well on the outer edge of the facial, the distal and the lingual. The mesial and the facial next to the tooth did not work well at all. I dropped back to .5W 7w/11a and this did not work well. The tissue was different in this area, more inflamed and granular. I used the laser smile at 2W continuous and finished the tissue reduction. Then I reduced the bone another 3mm at 2.5W 14w/25a with the G-6 tip..
Now things are becoming fun. The picture I did not get was the bloody mess. Talk about bleed. She has a problem with clotting and tonight was not the exception. I packed the cord to help. I left it until after cementation. You will see it in the photos. The rest is just simple core, prep and temp.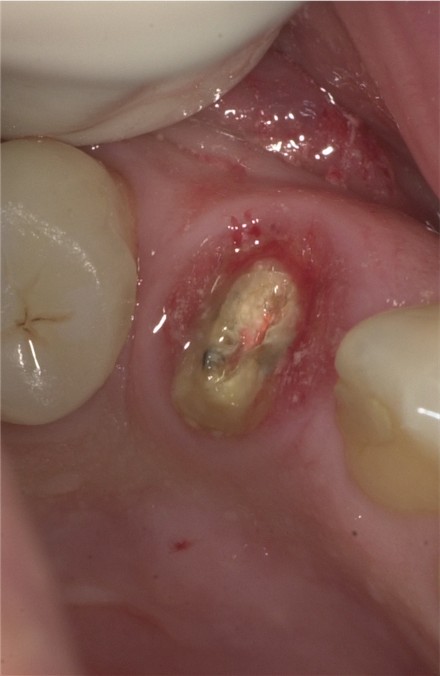
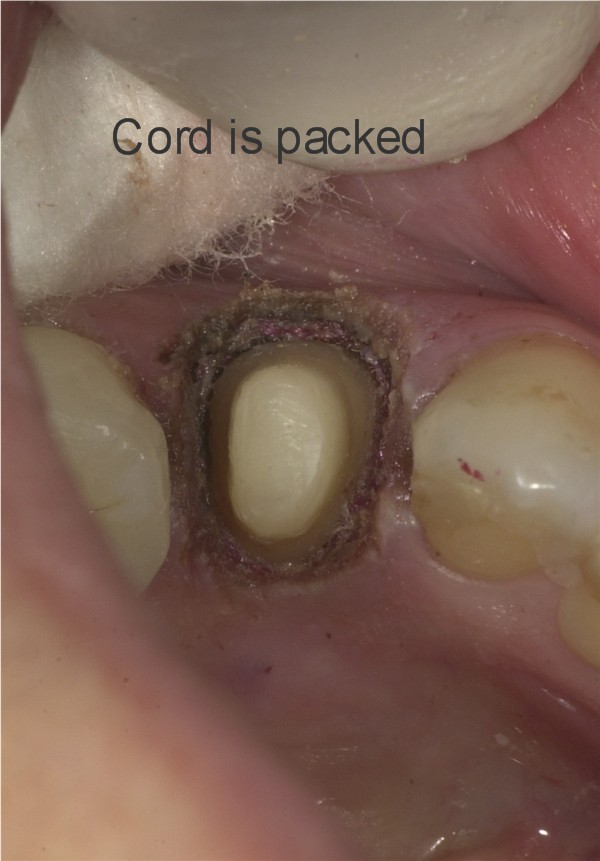
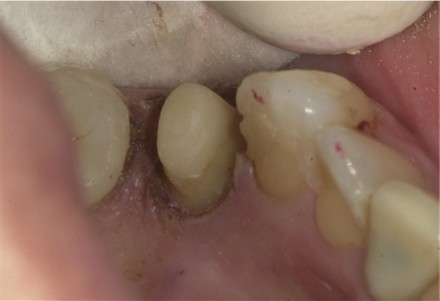
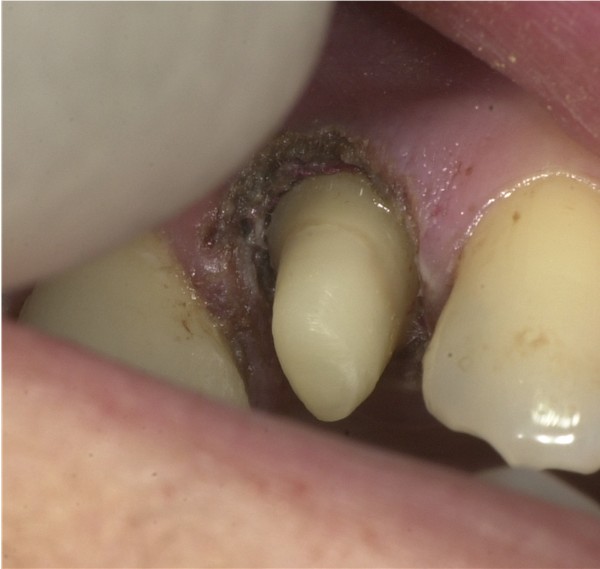
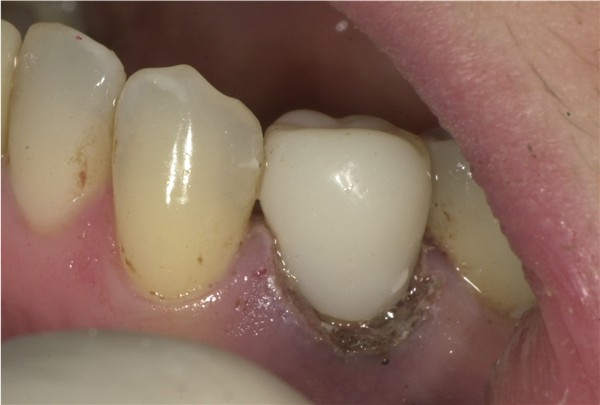
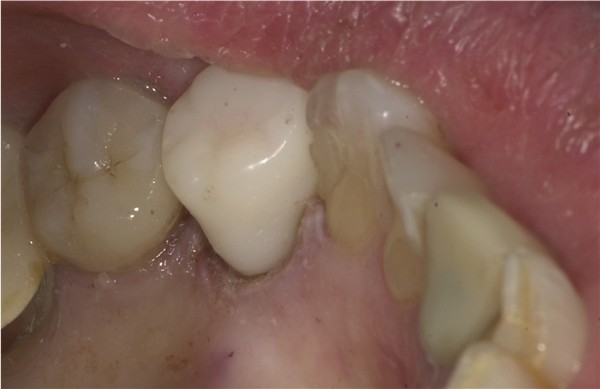
Ok, now I can go home!
DAvid
ASISpectatorHi David,
Good effort on a case considering that you had to wing it solo. Nothing wrong with how it turnd out.
How long did it take for the entire treatment?
Andrew
drcamSpectatorHey David, did I read correctly that you had trouble cutting the gingival tissues with the Waterlase? Was the tip damaged, is this a common occurence to have different cutting of the same tissues. Sorry about all the questions but I am a new Waterlase user first cases tomorrow – awesome. Could you also elaborate on your hemostasis control in this technique and you build up and temp crown technique. The temp crown in particular loooked awesome and considering you did it with no assistance even better. Great case thanx for posting.
Cam
dkimmelSpectatorAndrew, This took about an hour from the time the patient came and went. Seemed like forever. I really do depend on my assistants.
Cam, The waterlase can cut the gingival tissue well. My tip was fine. It was just odd that the tissue cut differently . That is the healthy tissue on the outer edges cut smoothly were as the granulated tissue seemed to absorb the laser energy and not cut. Be careful at what settings you are using. I am using a higher wattage but defocused then some. Try starting at the lower settings first. I used the diode in this case because I had it and wanted to see how it did with the granualted tissue.
Hemostasis is a problem with this patient in general. She has parathyroid and some renal problems. Everything was alright ttill I removed bone. Talk about bleed. That is why I packed an epi cord with Al chloride sponge on top. Let it set for 2 min and preped. Not ideal but I was not taking an impression .
The core was Build-IT with Simplicty as bond. I put the old crown back on and tacked it with composite then took a check bite impression with a bite material ( clear stuff from Miles). Then it was just a matter of sticking the temp. material in the impression and putting it back in the mouth. Trim it up and cement in place. This was the easy part. I was off on the temp color but I was getting lazy by the end of the appt.
Hope your case went well!
DAvid
Kenneth LukSpectatorHi David,
Great work!
It’ll probably take me two hours WITH an assistant.
Ken -
AuthorPosts
