Forums › Laser Treatment Tips and Techniques › Hard Tissue Procedures › 27 composite
- This topic is empty.
-
AuthorPosts
-
AnonymousGuestJust playing with the camera this morning. Thought these pictures turned out decent.
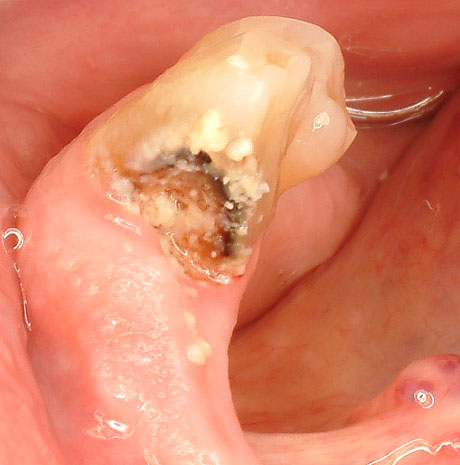
#27 image after removing some of the debris w/ explorer

er,cr;Ysgg No anesthesia.
Started defocused 5.25W 90/75 B& L 40 seconds each.
Dropped to 2.5W 50/35 to prep outline/ enamel removal .
1.5 W 35/20 to remove decay. Did use round bur to speed things up.
.75W 11/7 for gingivectomy/troughImages prior to final cervical decay removal


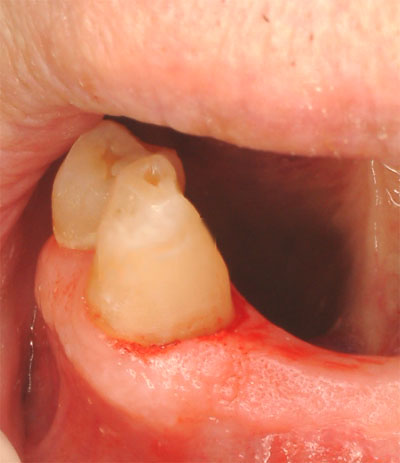
Final image

Would have liked more ‘during the process’pictures but my slowness with the camera was putting me behind schedule.
Suggestions?
Would you have removed more gingiva for better access?
SwpmnSpectatorLooks good to me and there appears to be adequate access to the cervical margin after gingivectomy.
Only thing I think about is that burnt orange looking dentin rock hard? I’m always scared I might leave infected dentin.
Al
Robert GreggParticipantRon
QUOTEWould you have removed more gingiva for better access?I wouldn’t. I think what you removed was ideal. These are the kind of patients that get decay wherever tooth is exposed to the oral environment. Remove more tissue, get more recurrent decay…..
Just my thoughts.
Bob
AnonymousGuestAl,
You’re correct the 2 images showing the gingivectomy/trough, both have decay. Just didn’t stop to take another picture after removing it-was getting too far behind schedule.
Glenn van AsSpectatorHi Ron………cool stuff , I do concur that there is decay on the tooth in the pics but what a nice result and all without anesthetic.
Looked nice and Marks spoons would have worked well I think. Either that or slowspeeds (round) shhh……..dont tell Mark I said that.
Nice color on the pics.
Thats the beauty of the scope is that I can click click click as I go without stopping to much.
Nice case Ron and great that you shared it.
Keep it and put it in powerpoint for a nice case.
Glenn
SwpmnSpectatorThat’s cool, Ron.
When I saw the images I felt there was still caries in #27 based on what we see here in Clearwater. Just didn’t want to be a smartass and say “You left decay in that tooth!”.
Al
rhenkelddsSpectatorA question from a new user, Is the burnt orange dentin always decay, even though it may feel hard to the explorer? I find that Dentin tends to discolor while prepping. So I have been using spoons and slow speeds to remove this.
Glenn van AsSpectatorHi Bob: AT high mag if there isnt enough water flow then you will get charring in the dentin. It could be your suction is to close, your laser trough that you cut is to narrow and water cant get down it or that the water on your laser isnt up high enough.
Others here can give you settings. Without the tactile feel of the slowspeeds its tough to tell sometimes if all the decay is out with vision.
High mag helps, some people use slowspeeds (me) or caries detector gels (not me – gets all over the enamel etching and is tough to clean up) or sharp spoons like Mark has for removing the decay.
I can tell you that at high mag the mushy dentin that is carious gets transparent with all the water and it is tougher to see if the decay is still there.
Often I etch the tooth and see the leathery dentin at high mag and then realize there is decay still left.
Hope that helps somewhat
Glenn
-
AuthorPosts
