Forums › Laser Treatment Tips and Techniques › Hard Tissue Procedures › Adventures in a crown prep
- This topic is empty.
-
AuthorPosts
-
AnonymousGuestHi all,
Got ambitious this afternoon w/ the camera and the erbium.EMLA placed in vestibule over apex. er,cr:YSGG .25W 0/0 20 seconds lasing topical, Z tip.
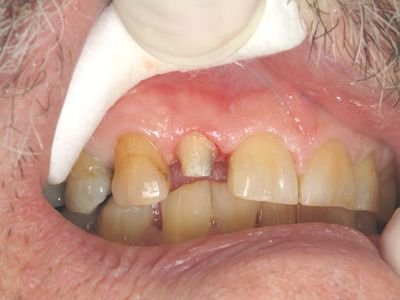
Preop
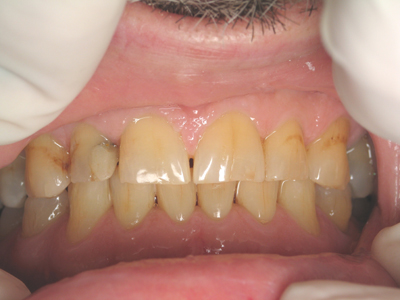
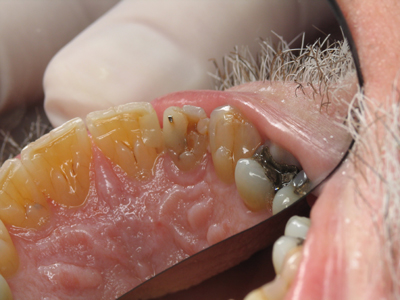
composite removed/rough prepped 5.25 W 50/20 for anesthesia, 3.0W 50/20 prep
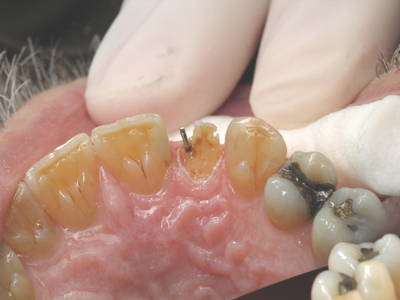
pin approached obliquely to prevent flashback. pin was cut with carbide to shorten after composite removed and ‘bent’ back in using plugger. decay removed w/ erbium/round bur – buildup one step/tetric ceram
er,cr:YSGG .5W 11/7 for trough -did have to reapply topical on distal
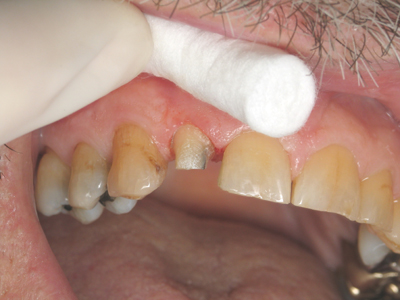
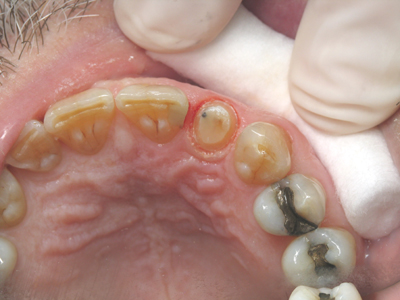
Temp
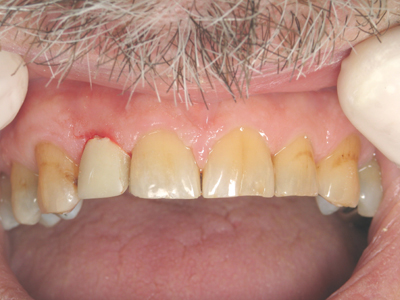
smoothing was real tedious and this prep took about 12 minutes longer for me than normal.
any suggestions /comments are welcome
kellyjblodgettdmdSpectatorRon – good for you! I am impressed not only by the amount and quality of your pictures, but how beautiful your prep looks. Nice almost parallel walls! Very impressive.
Kelly
ASISpectatorHi Ron,
Nice result with all laser technique. I think you did a marvelous job with it if a handpiece was not involved at all.
Thanks for sharing.
Andrew
AnonymousGuestQUOTEQuote: from ASI on 8:29 pm on Jan. 20, 2004
Hi Ron,Nice result with all laser technique. I think you did a marvelous job with it if a handpiece was not involved at all.
Thanks for sharing.
Andrew
Thanks for the kind words – high speed only for cutting the pin and slow speed for caries removal. I was tempted though, as I’m not usually patient enough to do all w/ the laser:)
I was looking for suggestions for smoothing a little quicker, any ideas?
2thlaserSpectatorRon,
What have I started!! Welcome to the world of laser crown preps! Neat huh? If you want to smooth the side of the prep, “shave” the side of the tooth with the tip against the tooth pointing gingivally (gently). Graeme talks about the Peripheral Rim of Enamel, and I have learned to just dissect that to create a smooth walled preparation, similar to what we get with a diamond…but actually, when you dry it after you prep it, it’s SMOOTHER. Like glass. Really neat to see. Hard to describe, but my video shows it nicely. Also, to smooth margins…use faster hand/tip motions, and it is MUCH easier with higer magnification, because you really can SEE each pulse of the laser. Right Glenn? When you alter the hand/tip motion, you can create smoother or rougher, surfaces based upon your visualizing the actual cutting and the speed of the tip/hand motion. I can show you at the ALD….I assume you aren’t coming to San Diego this weekend? Let me know.Nice job!
Mark
dkimmelSpectatorRon , Why? Was this a case the patient asked you to use the laser for the prep or this looked like a good one to do?
Nice!
AnonymousGuestQUOTEQuote: from dkimmel on 10:26 pm on Jan. 20, 2004
Ron , Why? Was this a case the patient asked you to use the laser for the prep or this looked like a good one to do?
Nice!Looked like a good one, good patient, only had 1 hygienist to check today, and I just decided why not?.
Won’t be a regular procedure until (unless) Mark teaches me all his tricks to speed this up.
Lee AllenSpectatorRon,
Nice case. Very impressive first time out of the box. I am encouraged to try this also, but case selection will be vital since I ususally do not have the time to “dink” away at it. Do you think practice will speed this technique up to the time for a bur prep?
I heard Mark’s presentation in San Diego this weekend and observed what he was talking about in the shaving and refining. It reminds me of woodshop where we used a router with an end guide. He is using the top aspect of the proximal wall as a guide for the side of the tip while it is shaving down the side at a slightly diverent angle. Obviously a light touch laterally or goodbye tip. He is also using a faster cruising motion and lower settings to all affect the power density in margin refinement.
Opps, did I give anything away?
Nice to see but not as easy as he makes it look.
But this is a nice result!
With the wonderful bondable surface, with what will you restore this tooth?
AnonymousGuestLee, not as impressive as you might think. One of the reasons I chose this one was because the bulidup needed w/ composite on the palatal. I spent a lot of time shaping and forming the composite w/ a composite instrument and bonding. This meant the palatal prep was only the last 2.5 mm for a wall and margin. I found the labial difficult to prep and smooth. Lots of defocusing and going back and scraping the roughness w/ Mark’s large spoon.
As far as time, I don’t think I will spend the time to practice these and improve my efficiency because its just so much easier w/ a diamond. I think the excercise served a purpose in helping me see what was and wasn’t practical for laser use in my office.
The plan is for a Procera crown.
jetsfanSpectatorRon,
Beautiful job! I suppose I will have to give this crown prep thing a try. Although my concern (as always) is getting adequate anesthesia.
You placed EMLA over the apex ? then lased the EMLA at .25W 0/0. I don’t remember hearing this one before. Was this an additional method of attaining some degree of anesthesia? Do you do this routinely for all operative?Robert.
AnonymousGuestQUOTEQuote: from jetsfan on 9:44 pm on Jan. 26, 2004
Ron,
You placed EMLA over the apex ? then lased the EMLA at .25W 0/0. I don’t remember hearing this one before. Was this an additional method of attaining some degree of anesthesia? Do you do this routinely for all operative?Robert.
Hi Robert,
This is one of the ideas I have been playing around with. There have been several studies in the dermatology area regarding the use of topical and lasers. As I progress on some of these I’ll give more details. I do not do this all the time but occasionally have found it helpful in some sensitive patients-who knows it might be placebo effect in that they have a numbness feeling. -
AuthorPosts
