Forums › Erbium Lasers › General Erbium Discussion › Disinfection of dentin during restoration
- This topic is empty.
-
AuthorPosts
-
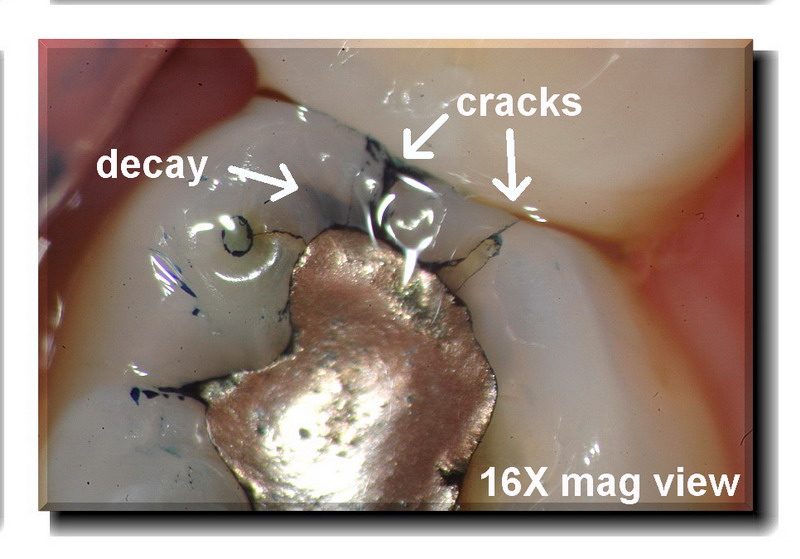
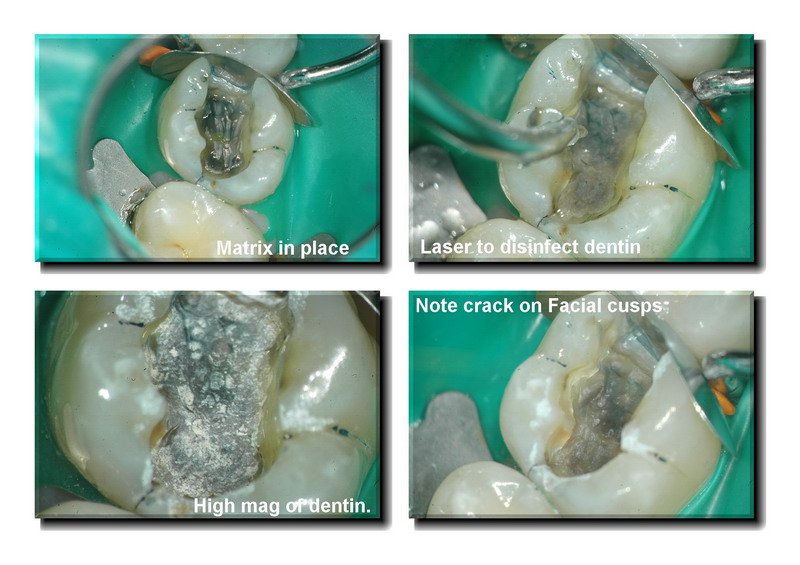
Glenn van AsSpectatorHi folks: off to exercise but one post before I go. This was a case of a simple occlusal in an upper molar. The patient had sensitivity to cold and chewing. I knew it was a crack and decay on the mesial (not visible on radiographs) but the problem is in documenting it for a crown. The dental plans never pay for this.
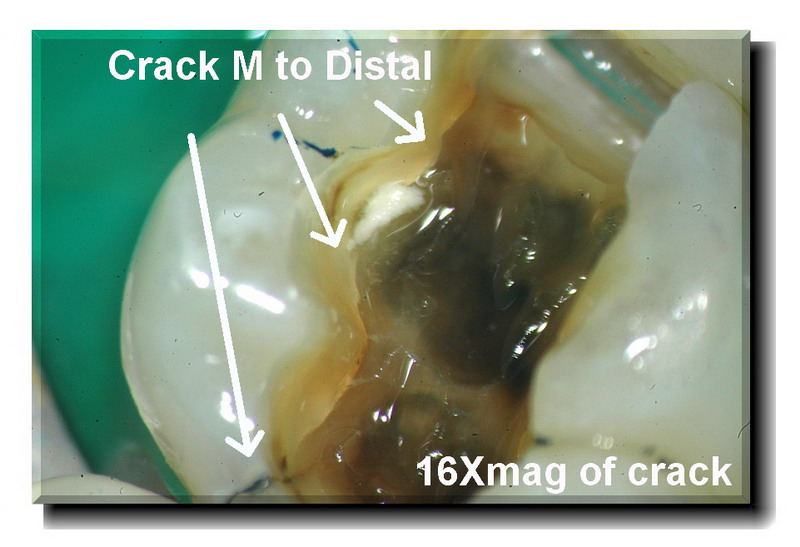
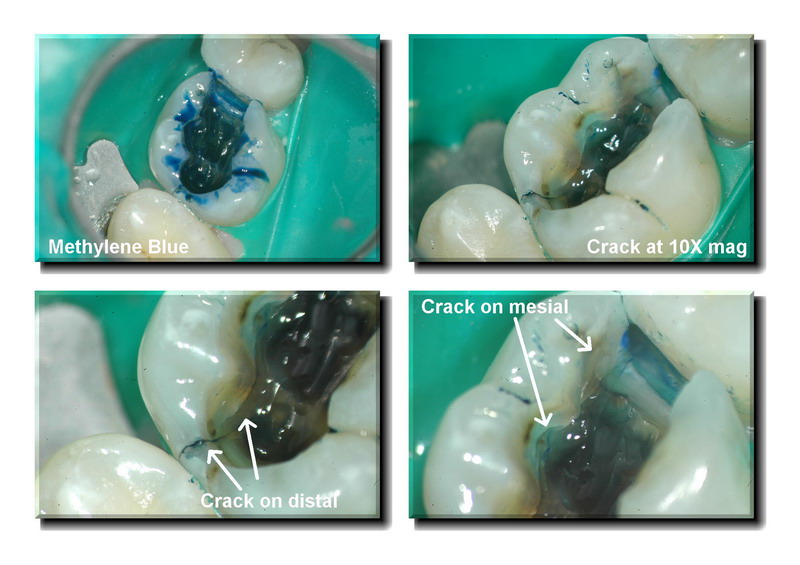
My strategy is to remove the amalgam, remove the decay and use Methylene blue dye which at times helps stain the crack , not that effective this time. I then do a core buildup , show the photos to the patient, adjust the tooth so occlusion is light and reschedule for the crown if the patient is adamant that they want to see about predetermination of benefits.
I use the Er:YAG laser to help disinfect for this procedure and we charge 30 dollars I think for this. I typically use a 600 micron tip (bigger footprint) and use 50 Hz now and 40 mj to get a nice fast disinfection.
Its another cool thing about using 50 hz, less dentin not covered during the disinfection procedure (less dark spaces between the white dots).
THe patient is made aware of the cracks, bacteria are removed, the smear layer is opened and the buildup done.
If the patient is suffering alot and doesnt want to be numb twice then we do the prep on the same day.
Just wanted to show this case.
Hope you like it.
Glenn
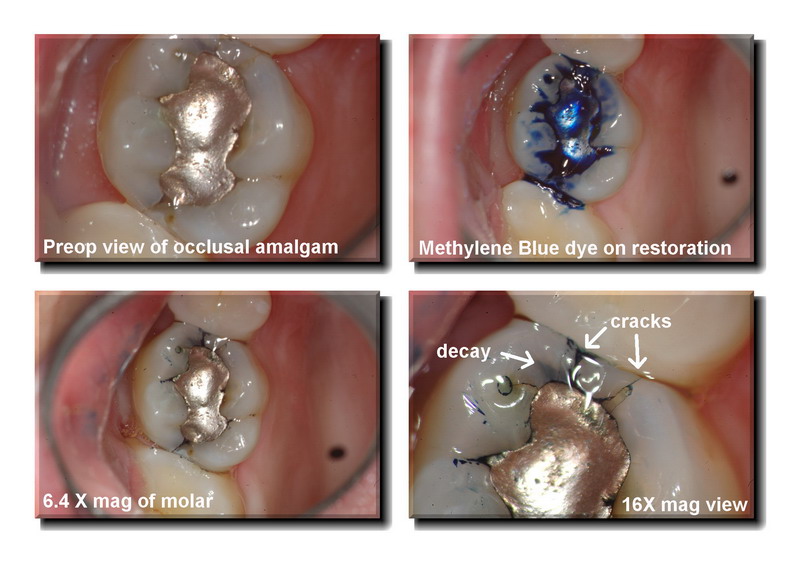


Glenn van AsSpectatorBy the way……here is the research to back up bacterial decontamination on the dentin for what I am doing.
Glenn
Publication:
Journal of Oral Laser ApplicationsYear 2003
Volume 3, Issue 3Reduced Bacteria Levels in Cavities Prepared by Er:YAG Laser
Anat Sharon-Buller/Colin Block/Igal Savion/Mordehai Sela
Purpose: This study compared the bacteria levels in cavities prepared by Er:YAG laser and by conventional means. Materials and Methods: Twenty-one cavities were prepared by Er:YAG laser ablation and 19 by the conventional technique. A sample was taken from the inner aspect of each cavity with a sterile swab and cultured on agar-blood plates. The plates were incubated at 37°C for 24 h, and the number of bacterial colonies was counted. Results: In 90% of the cavities prepared by Er:YAG laser ablation, bacteria were absent, while in the remaining 10%, bacterial cultures were very dilute compared to the results with the conventional technique. Bacteria levels were high in the cavities prepared by conventional means. Conclusion: This study demonstrates greatly reduced bacteria levels in cavity preparation when caries is ablated with the Er:YAG laser.
SwpmnSpectatorGood job with the case. Patient will most likely experience an immediate relief of symptoms. I’ve had some like this which have held up for years once caries removed and fractures bonded. Can always do the crown later as time/finances allow.
Research findings are encouraging. Next month we will make four years using erbium lasers for caries excavation/disinfection of dentin. Eliminates patient having to experience the aggravation of the slow speed handpiece. We see a marked reduction in sensitivity or need for endodontic therapy since going erbium.
Al
Glenn van AsSpectatorHi Allen……great picture there by the way (GRIN). Nice to hear from you, hope all is well.
I hope that you are going to the Clearwater meeting at Dannys place in a month. Will be looking forward to it.
Couple of things. The scope is great for showing the patient the cracks (take the photos or show them the live view)and the patient is scheduled for a crown. It is very effective documentation for the dental plans which look at a radiograph of an occlusal with some base under it (man these are the ones that crack all the time) and they say alternative materials will suffice. SHow them this photo and they approve it right away.
As for the erbium part….I just feel more comfortable using the laser on those black areas that are hard but stained and I agree that the patients complain of less sensitivity when doing the comps this way. There are so many reasons for the sensitivity after comps, one is for sure bacteria left behind, another is not getting resin (flowable ) right onto the margins in the boxes. Anyways, 4 years flies by doesnt it…….the amount of new stuff coming out with erbiums is getting less and less, but still I have many people buying them who need some help during the early stages of their learning curve and cases like this show how the laser can be used routinely for restorative.
Glenn
BNelsonSpectatorNice documentation, Glenn. And thanks for the link to the research!
Glenn van AsSpectatorThanks Bruce…….I appreciate it and no problem with the research. I am doing my darndest to make the erbium work with the research in mind. Evidence based dentistry it is !!
Thanks again and cya
Glenn
Graeme MilicichSpectator
Glen
I was having a poke around the site tonight and spotted this post. I have tried something similar in the past and got bitten in the bum big time!
The problem was after fitting the crown, the patient complained of pressure sensitivity when biting.Where I have pointed to with the arrows shows white areas along the crack. These are true microgaps (dessicating makes them appear white once the water has been blown out of them. Air-abrasion really makes these things stand out!) THe problem with these cifrogaps is if there is any movement in them, they cause hydraulic pressuring of the underlying odontoblasts. They hate this!!!
Release of pressure cuases instant pain. Just like under a debonded composite. If this is under a crown, you are looking at significant costs in repairing it.
As a result, I always dissect out along the fracture line and ensure I have a good core material contacting the fracture surface, rather than leaving the microgap in place. You get away with it sometimes, but once in a while, these will bite back if the fracture microgap is left in place.
Just an observation based on the “been there, done that” school of hard knocks!!!
Cheers
kellyjblodgettdmdSpectatorDudes – what an awesome exchange! Glenn, your post is so well done. Thank you for taking the time to prepare and post it. The methelyne blue trick with with microscope mag is too cool
Graeme – great comments that I’m sure will help a lot of us in minimizing post-op sensitivity in the future. Thanks guys!
Kelly
Glenn van AsSpectatorHi Graeme…..these are things that are hard to notice and only seen with the scope. We are now looking at segments of cracks that are difficult to see without the extreme magnification of high powered scopes or loupes.
I have never heard of this but I am sure that if you suggest it then it is true as I know that you are using a scope as well. I am also sure that alot of what I hear at the WCMID when I attend this year will be new to me as well.
As for this case, its ironic that the patient was in today for a crown prep and I advised him of the potential for endo.
I couldnt have gone much further than what you see without hitting the pulp and I for one like to keep the cuspal portions of tooth intact.
I also dont believe that further dissection of the crack will avoid endo. Here is my treatment sequence……for what it is worth
1. Evaluate crack by removing amalgam and do composite core buildup without total destruction of the tooth (ie shoeing cusps isnt my aim) and these mesial buccal and distobuccal cracks are ALWAYS ALWAYS cuspal fractures requiring cuspal support. I refuse to break them off or shoe them if they exist.
2. I do the crown and temporary cement it to evaluate the tooth. If the tooth doesnt settle down, or if it becomes more sensitive to chewing and cold , then I do the endo and remove the temp crown going through the access.
3. THen after the tooth settles down I cement the crown on.
One thing I feel very comfortable with is crack diagnosis and treatment. I had one the other day on my mother in law that I will post but it was two cracks. One that was a ML cracked cusp (not a worry) but one that ran Mesial to Distal on the mid floor of the prep….(THESE ARE UGLY)
I did the endo because I know that most of the M-D ones like that are into the pulp and her symptoms were suggestive of irreversible pulpitis.
I appreciate your points and agree with you on this but in all honesty I think the treatment wont change.
Crown it if it settles down (I doubt it) then cement permanently.
Most likely it may need endo, but the documentation and sequence allow the patient the opportunity to escape endo. I hate ortho bands on teeth but that is another option.
Gotta go and I appreciate your insights to what you are seeing, I agree with the thoughts but am not sure how my treatment sequence will change.
Cheers and thanks for taking the time to post this and its a great topic for discussion.
Glenn
Graeme MilicichSpectatorGlen
For what it is worth, if this tooth doesn’t settle down, before doing the endo, please remove teh fractured cusps. Dissect them off along the fracture interface. If you don’t expose the pulp (I reckon you wont), I will put a a good glass of whiskey on the table for you at WCMID on the fact the tooth will settle down and wont need an endo.These teeth don’t settle because the microgap associated with the fracture is unstable under tension loads. I alway dissect these right out to the enamel. If I expose, so be it, but if I don’t (95% of the time) then the tooth almost always settles down.
Cheers
Glenn van AsSpectatorNeat idea Graeme and I guess the question is to the degree of tooth structure that requires removal in order to accomplish the task. In this case two cusps are needed to be removed because the cracks undermine the MB and DB cusps.
I agree with the concept that the cracks may still flex but if the pulp is involved it will require endo.
Anyways , this case is too far along to intercept but next time if it is one cusp then I will look at dissecting it but most of these cusps will require shoeing it, as dissecting a crack that goes straight out to the enamel means it needs shoeing.
I just dont believe in doing that as I would rather have the cusp for tooth structure.
Anyways, great discussion and I will look at doing it fro a single cusp next time but not one that involves half the tooth like this one.
Cya and great stuff
Glenn
jetsfanSpectatorGraeme,
I have found that when I dissect cracks, very often they will spark. Is this from mercury that has leached into the crack, or is it something else?
Robert
Graeme MilicichSpectatorI disect these with air-abrasion. Reason? AA dessicates the fracture and you can readliy identifty it as you are dissecting it out.
Often they stop halfway through teh dentin. There is notihing other than AA and magnification that will let you identify a crack that is running out and has not extended all the way to the buccal surfaceCheers
Graeme MilicichSpectatorJust so others understand what I am going on about.
In the first image, a force in the direction of arrow 1 places the dentin in the bottom corner of the cavity under tension and a crack begins to slowly propogate from the base of the cavity, obliquely through the dentin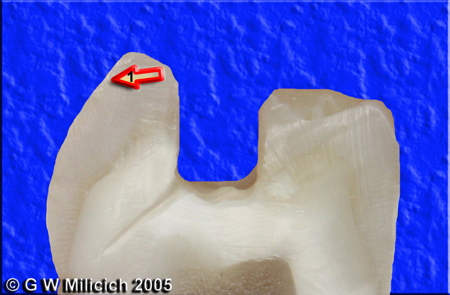
Constant cycling creates micromovement in the direction of arrow 2 and creates a cleavage plane. The dentin is no longer connected, so when the patient creates micro-movement by chewing, that creates a load in the direction of Arrow 1, and the gap opens slightly. Release of the pressure then causes a hydraulic pressure on the dentin tubules and causes PAIN. The common complatin is pain on chewing hard things and cold sensitivity, sometimes hot sensitivity (just like a debond under a composite. The solution is the same. Get rid of the microgap!!!)
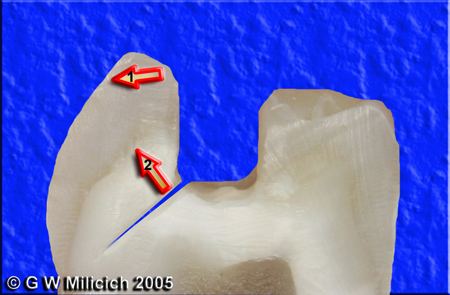
If you restore the tooth in this state, the crack is still there and continues to cause problems. Also, if you restore then prep for a crown, the section that is cracked is still dissociated from the underlying tooth, even if it is held in palce by some composite and will most likey still cause problems
Here is how I control the microgap and get rid of it. Most of these are done as in teh example below and I don’t bother crowning them. They remain functional and stable for years.
I have had 100% success in restoring these teeth by dissecting out the fracture using a fine bur or Air-abrasion. Often these cracks stop short of the enamel. If they make it all the way, the cusp falls off.In teh next image, I have dissected out the “crack” and reduced the cusp height and created a nearly full thickness bevel onto the buccal enamel
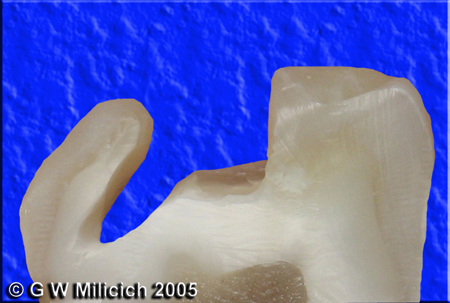
Then it is a simple matter of restoring the tooth either using a GIC composite co-cure restoration or a bonded composite. The advantages of this technique are that the margin – arrow 3- are ealy to finish and make very aesthetic and they are well above the gingival margin so there is little chance of microleakage and recurrent caries because it is finished on enamel, not dentin.
THe remaining cusp is now stable, there is no microgap still present that can continue moving creating thehydraulic decompression/compression cycle that causes all the pain.
.

The chance of exposure exists it the tip of arrow 4 and is totally dependent on the angle the fracture runs out at. If it exposes, so be it, but about 99% don’t and teh patient gets to avoid an endo. Occcasionally ther is an incredibly high pulp horn and you are doomed on these. Just have a really close look once you have dissected out the crack. I never remove dentin from the pulpal side of the crack, only the cuspal side, to avoid getting any closer to the pulp
Here is a case using this concept. (not good photos, I captured these with an intraoral camera several years ago)


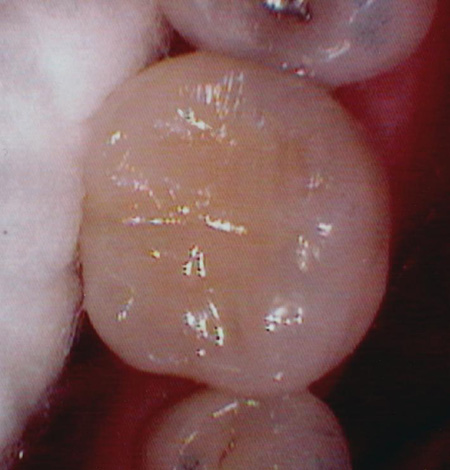
Works on any number of fractured cusps. You can crown thesetat any point, as long as you can establish a 2mm ferrule.
Cheers
(Edited by Graeme Milicich at 6:04 pm on May 26, 2005)
Robert Gregg DDSSpectatorQUOTEQuote: from Graeme Milicich on 2:23 am on May 26, 2005
There is notihing other than AA and magnification that will let you identify a crack that is running out and has not extended all the way to the buccal surfaceHave you ever tried a pulsed Nd:YAG for selective dissection of fracture lines?
I have found they are more precise and selective for these sorts of defects.
Bob
-
AuthorPosts
