Forums › Laser Treatment Tips and Techniques › Hard Tissue Procedures › How to do a Class I, the easy way, I think!
- This topic is empty.
-
AuthorPosts
-
2thlaserSpectatorHere is a set of pictures I did today, for one of my upcoming lectures on how to prep a class I very easily. This is the way I do it, and it really is fast for me.
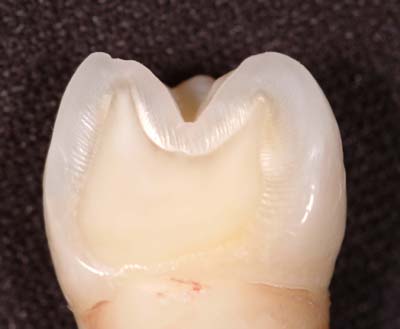
Here is a sequence of photos the first one being a sectioned premolar.
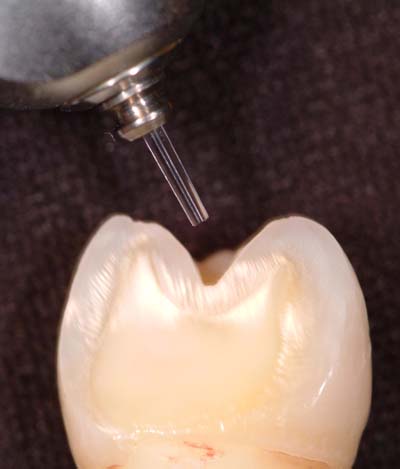
Next, is the angulation of the Waterlase Tip with proper angulation to the enamel rods.
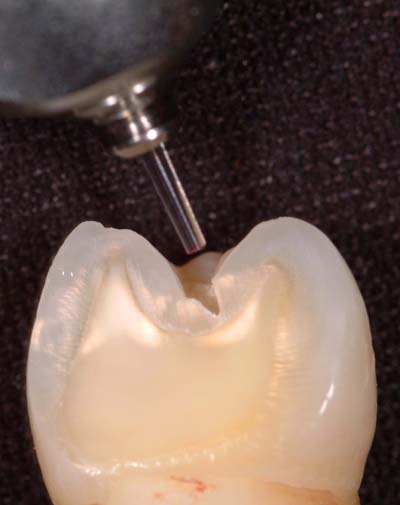
Followed by actual ablation, usually 2 swipes, slowly, mesial to distal and back to initially open up the prep.
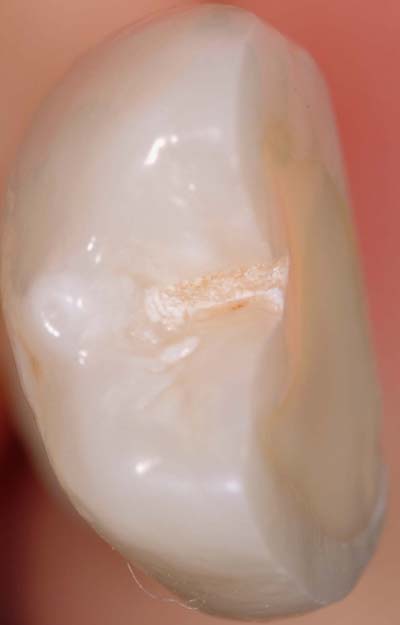
Occlusal view of initial “cut”…
Next, change the tip angulation to the opposite side of central groove, keeping the proper angle to the enamel rods for maximum ablation….
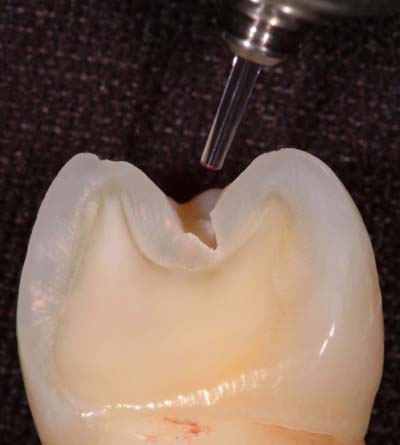
Next photo, actual ablation…
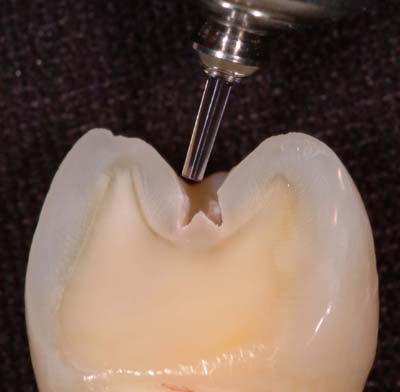
Once this is completed, again 2-3 swipes SLOWLY from mesial to distal, you can now aim your laser tip to direct the energy at the central groove area, where the decay USUALLY is in small to medium preps and open it up the rest of the way…
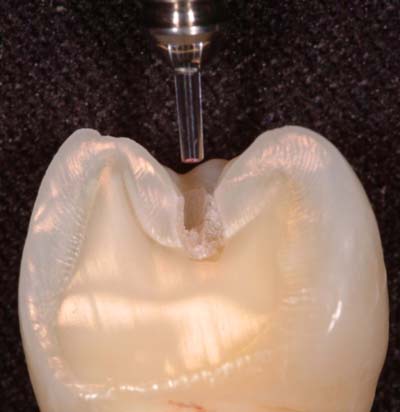
I then go in with my small microspoons to finish decay removal…then go back with the laser to make sure (using very low settings) the smear layer is gone, and the tooth structure is completely ready for bonding with my restorative materials. As most who use lasers know, the laser really gives us an optimum bonding surface which is a real nice advantage to going back after using a spoon if I need it.
Here’s the prep from an occlusal perspective….
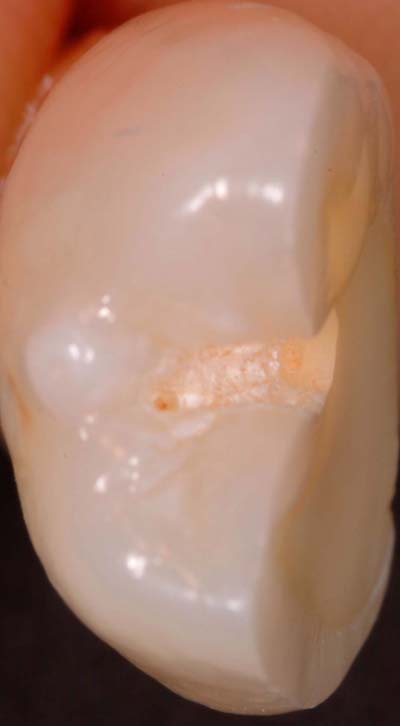
I sure hope this helps to speed up some learning curves. I have talked with Stu and others alot about this technique, and it really does work well to speed up the process on a class I. Sorry if this post was long, but it’s intention is to show, and help those who are having trouble with some of the easiest of things to do with a laser. It takes a bit of time to learn, but once you get it, you won’t believe how fast it is.
Thanks for letting me share!
Sincerely,
Mark
ASISpectatorHi Mark,
Very nice illustrations of angulation of approach to enamel rods.
Andrew
kellyjblodgettdmdSpectatorMark: Thanks for the great visual! The cross-sectioned tooth really helps me visualize the process. Keep up the great work.
Kelly
2thlaserSpectatorThanks Kelly, I just get these questions all the time when I am speaking, and I thought, I needed a visual to show everyone. When I show this in a “hands on” format, I ALWAYS get the, “now I got it!!” exclamation about a day or so when they get back to their offices. SO, that being said, I thought this might be a help in visualizing the way it seems to work the fastest for those who seem to be having problems with what I consider the most easiest of preps…ok Class V’s are probably easier…but you get my drift!
Thanks,
Mark
AnonymousGuestGreat pictures, Mark, thanks for posting.
How about going further and show some class II’s on permanent teeth? Still finding these frustrating. Not the prep part, but rather sensitivity. Today, did 20 DO and 29 DO but patient still had quite a bit of sensitivity (did refuse offer to numb up, though). Bathed buccal 30 sec, lingual 30 sec, occlusal 30 sec all at 5.5W 90/75. Started removing marginal ridge defocused and slowly moved into focus. Once to dentin dropped to 3.25W 60/40.
Continued to drop down all the way to 1.75 W 40/30 as patient complained of sensitivity. At that low a setting it was taking forever and a day to get anywhere.
Got any hints or tips?
Thanks,
2thlaserSpectatorThanks Ron,
First, I really advocate changing your settings to have a 30% differential air to water, it really speeds the cutting process. Also, I start really doing a slot prep more than anything else, if I can’t do a tunnel prep. There is usually so much enamel there, you continue to anesthetize as you ablate the enamel, with virtually no sensation at all, at least in my hands. Really focus the bathing to the occlual surface, directly, and SLOWLY into the central groove to maximze the thinnest part of the tooth for penetration of the laser energy. Once into dentin, I automatically drop to 2.75-3W, without really changing air/water…I keep the air at 80%and the water at 50% the whole time, unless lots of discomfort. Seriously though, I really don’t get much or any discomfort…lucky I guess. It’s funny you mentioned the class II’s because this morning I was talking to my staff about trying to do the same type of pictures with that in mind. I have to just figure a time to get it done. Great idea, (great minds huh?). Call me Ron, if you have any other questions…sometimes it’s easier on the phone.
Sincerely,
Mark
dkimmelSpectatorMark, Kept your photos in my head this morning while trying to do #15. It took like 10 times of forever at 5.5W 90/75. Dropped to 2.75W forgot the A/W setting for dentin. No sensitivty. I did the 90 sec deal a couple of times. Puzzled by the aamount of time it took.
I checked the tip undert the scope and the end was fine. The end that goes into the handpiece did have the white coneshape area.
Changed the tip and the next patient blasted trough a premolar in record time. The assistant was blown away. Cool.
Thanks for the picture it really helps.
David
2thlaserSpectatorDavid,
Cool. Glad to see you learned about where to look at the tips. I tell you, it really IS fast if you know what you are doing. (Not that I know what I am doing most of the time!). I guess alot, contemplate alot…then just do it. I take notes, then learn, and then share with y’all. Thanks for the nice posts.
Mark
dkimmelSpectatorMark what are you doing with bombed out teeth with old leathery caries. I am not having much luck. Takes forever. Your spoons are great in these areas but I was hoping to do more with the laser and just do a final check with the spoons.
By the way you are going to kill my budget next month. I was using the composite placement instrument this morning and its great. It is just thin enough and just stiff enough to work the interproxiamls.
Thanks, my wife is going to kill me.
David
2thlaserSpectatorDavid,
Actually I use teh laser…usually at 2.5-3W and keep penetrating the decay. What I notice is that the decay losens up from underneath and you can get it out in once big scoop using the #5 or #6 excavator. I then resterilize and fill. I do use the laser, and so far, it’s not too slow for me at least. When we get them real desensitized, it’s easy.I am glad you like the instruments. I REALLY like the placement instrument, as you say, it’s great for shaping interproximal areas prior to curing. It really cuts down on my finishing time. Glad to hear it! (I need a scope, I need a scope,…)
Mark
Glenn van AsSpectatorHahahaha……..the scope bug is like a bad flu bug…….it catches everyone in the room.
I think its great that people are beginning to realize the value of magnification for laser dentistry.
The scope is alot of fun for documentation and for providing the treatment.
All the best…….
Glenn
SwpmnSpectatorThanks, Mark, for the excellent photos demonstrating the most efficient orientation of the Erbium tip to enamel rods.
With the shorter 4mm tip, how far are you away from tooth structure as you ablate? I know you have told me the ablation is faster with the G4 tips as opposed to the longer G6 I use.
Al
Glenn van AsSpectatorHi Al: the G4 tips are narrow at the end (400 microns) than the G6 tips which are 600 microns and the power density is much greater so it will cut better but remember that these tips can be more sensitive for the patient as well.
Glenn
FlashgordonSpectatorMark, Nice case! What settings did you use on the Waterlase and how long did it take to do the prep? I’ve had a Waterlase for about 1 yr. I’ve been using it at about 5+ Watts and it takes forever to cut through the enamel using the same angles, etc. Once through the enamel I power down, but it just seems to bounce off the dentin. I’m not an old techno phobic who can’t program a VCR, just frustrated. Any suggestions?

Thanks!
2thlaserSpectatorHi Flash! Welcome to the board. I start out using 5.5W, 80%air, 50%water, G-4tip. That about does it. It goes REAL fast for me. Today I did 6 class I preps in about 1/2 hour, start to finish, all around a 45-50 on the Diagnodent. Super easy. I hear people having trouble with Class I’s and I really can’t relate. I think that keeping the tip at appropriate angles, AND making sure you know how to use the defocussed and focussed modes appropriately are what is needed. Also, we have found that a 30% air/water differential is also essential to maximum ablation. Hope this helps!
Mark -
AuthorPosts
