Forums › Laser Treatment Tips and Techniques › Hard Tissue Procedures › Man the silence is DEAFENING
- This topic is empty.
-
AuthorPosts
-
Glenn van AsSpectatorWell here is a simple thing for you all…….this is still my favourite thing to do with the erbium , its easy , quick and makes a big big difference for the patient cosmetically and to their tongue.
What do you like doing the most with your erbium…..(no wisecracks for you smart alecks!)
Glenn
ASISpectatorHi Glenn,
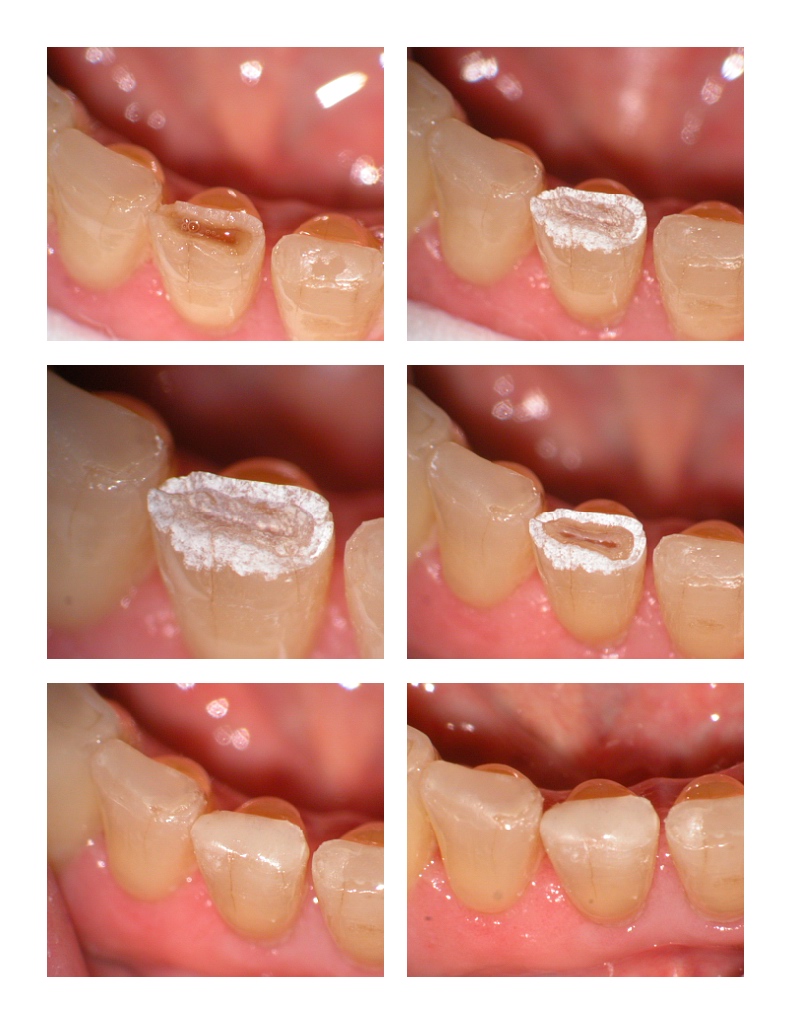
Incisal composite is certainly a simple procedure that makes a big improvement for the patient in terms of appearance and comfort.
It is easier to do than most Class I preparation since very little enamel has to be removed. Not to mention the easy access as well.
Preop
[img]https://www.laserdentistryforum.com/attachments/upload/wlindsey1.JPG[/img]Prep with Er:YAG
[img]https://www.laserdentistryforum.com/attachments/upload/wlindsey2.JPG[/img]Postop. Shade is a little darker than ideal.
[img]https://www.laserdentistryforum.com/attachments/upload/wlindsey3.JPG[/img]It has been quiet indeed. I would really like to see more clinical postings than the rhetoric that continues on and off and quite intensely at times….
Happy Canadian Thanksgiving to all.
Andrew
2thlaserSpectatorNice stuff guys…..Ok, here is the latest from my neck of the world. My receptionists mother presented with a upper partial denture. She INSISTED on NOT getting implants in the edentulous area, and really had this “gummy” smile. She refused any type of surgery to even reduce this, and she asked me to do whatever I could do without the hinderances of surgery to help her. So here goes..
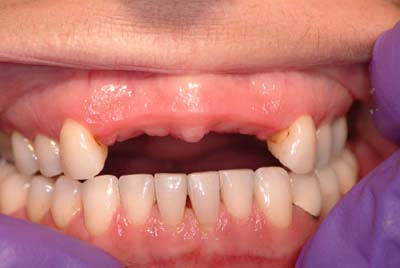
Pre-op Facial View
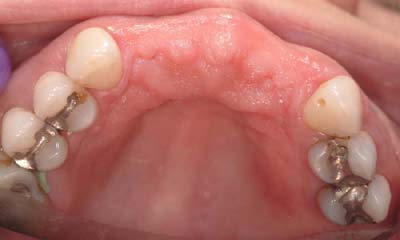
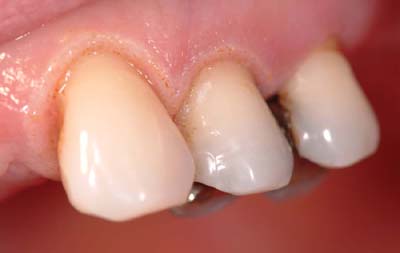
Pre-op occlusal view. Sorry bout the impression material!She had existing amalgams on #5, 12, and 13. We decided to do some ginigival reduction on 5, 6, 11, 12, and place a single crown on 5, bridge 6-11, and 12-14 with a SMALL canteliever. (we will be restoring the lower arch, once we establish the anterior guidance, etc….). The pocket measurements (sorry no photos) were such that we had about 1.5-2mm of tissue to “play” with, without disturbing, and violating the true sulcus. We then proceded to reduce the tissue, (using Glenn’s technique with floss, and making outline marks with a perio probe), with the Er:YSGG laser.
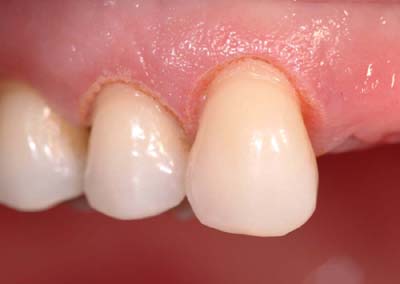
#5 and 6.
#11, and 12.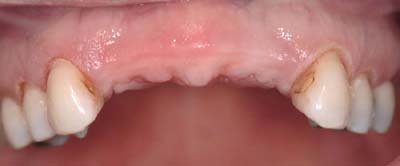
Full arch view.We then prepped #’s 5, 12, and 13 with a diamond (oh how that hurts to admit that!) We found decay between #12 and 13 that I was able to reduce the tissue with the laser very easily with, then finish the preps. Then I proceeded to prep 6 and 11 with the laser. I used a G-6 tip, at 3W, 60%air, and 30% water during reduction, and to marginate, I used 1.25w, 60/30 air to water for the laser preps.
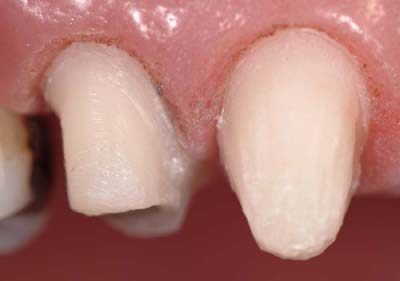
#5, and laser prep on #6.
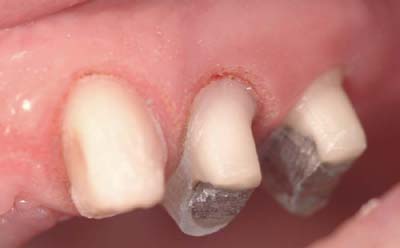
#11 laser prep, and 12, 13.
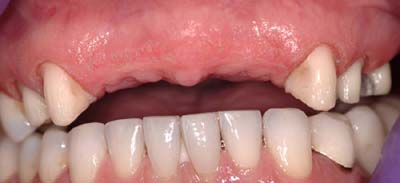
Full facial view of the case.I used anesthetic on 5, 12, and 13. None on 6 and 11, however, I am sure some infiltrated over to those teeth.
I asked the patient what she felt, as far as the drill vs. the laser, since this was the first time I was able to do both side by side, and by far, she said the laser was very much more preferred. Smell, vibration, and sound were the important factors. We will be doing a bisque bake try in in a couple of weeks, and I will show more as this case progresses. Fun with lasers!
Mark
Glenn van AsSpectatorHey now that is cool……..love the pics and the process is neat.
Tell me about the laser preps , a couple of things.
Did you do the whole preps with the laser or did you touch them up with the bur afterwards as it looks very smooth without any enamel etching.
Are you in dentin there?
Secondly , tell me about the time it takes for you now to prep the canines versus the time it take to prep with a bur the other teeth.
Neat case, I love the laser recontouring and it looks excellent on the photographs.
The floss works ok to line things up and your final results are really excellent.
Oh by the way which laser did you use……..on second thought…….GRIN.
WOnderful case, looking foward to the final photos and I am sure that your receptionist and her mom will be ecstatic.
Glenn
2thlaserSpectatorThanks Glenn, thanks for spurring me to post again, been too lazy lately.
“Did you do the whole preps with the laser or did you touch them up with the bur afterwards as it looks very smooth without any enamel etching.”
I did the WHOLE preps with the laser, NO DRILL/BUR!!! I try to be a purist;)! The smoothness comes from understanding how to angle your laser tip at the appropriate angles, to “shave” the side of the tooth, rather than at a 90 degree angle, which creates the rough, cratered surface.
“Are you in dentin there?”
Again, yes, I am in dentin. I noticed one thing in particular with ALL the laser crown preps that I have done, is that when you get into dentin, it’s MUCH easier to have smooth tooth surface, vs. rough as it is in enamel. That is just the properties of Er as it ablates the differing hard tissues. Just like bone, it seems to be so much easier due to the fact that the density is so much less than enamel, which is the densist.“Secondly , tell me about the time it takes for you now to prep the canines versus the time it take to prep with a bur the other teeth.”
Good question…It took me all of 8-10 min to prep the canines, (each). The time consuming thing is trying to get real good margination, takes a bit of time and angulation. I can prep a tooth with a diamond, if there are no complications, like recurrent decay, etc…a bit faster than the laser, BUT if you combine the use of anesthetic and the drill, the laser is about even on time…..for me, because I practice these. There are a few others, like Ron Kaminer, and Kim Kutsch who do laser preps, but are slower, due to the fact they are just learning how to do them. Remember how long it took to do our first class I amalgams in dental school? Now, we can fly through those procedures…as do I through laser crown preps, because I do alot of them.
Glenn, thanks for the help in understanding how to recontour, and the tips. Without your posts, I would have stumbled through it, it made it so much easier with your instruction. Thanks, as always, for being so gracious.
BTW….I used a Er,Cr:YSGG laser. 😉
Mark
PS….If you look at the preop photo’s, I removed a bit of GI on the mesial of #11. It sparked a bit, BUT, it really came out fairly quickly. Again, used about 2W to remove, slowly, but surely in a defocussed mode, as I like lower energy when doing most of my procedures. I have noticed that some GI I can remove, and some I can’t. Just like the porcelain veneers I removed. Some others I haven’t been able to.
In addition, the soft tissue settings were, Z-6 tip, .75W, 24%air, and 14% water…for the recontouring.
M
marc andre gagnonSpectatorhi mark
nice case
just a small question
how can you modify the mesial and the occlusal surface of the amalgamal without using a burthanks
2thlaserSpectatorDear Marc-Andre,
I stated that I used a bur on the teeth with the amalgam, and only used the laser for #6 and 11 which did NOT have amalgam. You CANNOT use a laser on amalgam, period. I was hoping I made that clear in my answer to Glenn, and in my post….Hope this helps.
Mark
AnonymousGuestHi Mark,
I was wondering if at the try-in you were planning on doing some gingival recontouring for the pontics?Looking forward to seeing the followup images.
2thlaserSpectatorHey Ron,
Great idea, however, there is VERY little tissue there, and the bone is very dense. I am not sure how much room I have to do this, AND her arch form will actually allow me to have the pontics a bit more labially than I had originally planned. BUT, because you mentioned it, I will gladly evaluate it, and if possible…how would you recommend I go about the process?
Mark
mickey franklSpectatorHi Mark
Amazing laser preps,as usual.
You originally recomended using the T4 tip for soft tissue.Is that still the best soft tissue tip?
Thanks for your case presentation and to Glen for your case
Mickey
2thlaserSpectatorHey Mick,
I use T-4 most of the time, but the Z-6 has a larger footprint, for what I needed at the time. I also can use it at a SLIGHTLY higher wattage setting due to the fact it’s NOT tapered, which means it has LESS energy at the tip than a T-4, and when doing the more delicate tissue work I was doing, I wanted a larger footprint, more control, and less overall energy, which is what the 600 um tip (Z-6) gives me. Make sense?
Mark
AnonymousGuestQUOTEQuote: from 2thlaser on 5:57 pm on Oct. 14, 2003
Hey Ron,
Great idea, however, there is VERY little tissue there, and the bone is very dense. I am not sure how much room I have to do this, AND her arch form will actually allow me to have the pontics a bit more labially than I had originally planned. BUT, because you mentioned it, I will gladly evaluate it, and if possible…how would you recommend I go about the process?
MarkMark,
Provided you have enough tissue (probed under anesthesia) , what I’ve done is build up my pontic on the temporary like I’d like it to be. Use one of our markers we use for marking sore spots on dentures (name escapes me now but they are little wooden sticks with purple indicator that marks when wet). Color the tissue contact side of the pontic and then seat the temp in the mouth. You should get a pretty nice ‘ purple marked’ area to use as a guide for tissue reshaping. I’ve only done this a couple times as we don’t get the opportunity to do many bridges (low median income in the area) so take it for what its worth. Maybe everyone can brainstorm and come up with an improved way, but hopefully this will be a starting point.
p.s. here’s one someone posted on DT. Alot fancier than what i’ve done but pretty impressive. [url= [url=”http://www.dentaltown.com/idealbb/view.asp?topicID=21864&forumID=10&catID=10&search=1&searchstring=&sessionID={6A09E656-B0A8-48A6-B076-189B97988638}]”]http://www.dentaltown.com/idealbb….88638}][/url] An ovate pontic case I did with my Waterlase by mcditolla
[/url]
SwpmnSpectatorExcellent soft tissue recontouring, Mark! Tissue looks great, noted the virtual absence of charring.
Al
dkimmelSpectatorMArk, Looks like lasing those bowling balls has paided off. Nice preps.
David
ASISpectatorHi Mark,
Your prep on the cuspids are very nicely done. Looks like you have mastered the crown prep technique well. Great work.
Do you find it easier to work on anteriors as opposed to the posteriors with laser crown prep? Which tooth and in which quadrant do you find to be more of a challenge?
Have you consider or tried to do a prep with a modified tip so that the working end of the tip is more diagonal in nature to provide a greater surface area?
Andrew
-
AuthorPosts
