Forums › Laser Treatment Tips and Techniques › Hard Tissue Procedures › Pulsed Nd:YAG for Locating & Opening Calcified Canal
- This topic is empty.
-
AuthorPosts
-
Robert GreggParticipantHi Everyone,
There is NOT enough protective armour that Rod Kurthy could don on me, or flame retardant material that Glenn could loan me, or that I could put on, that would protect me from posting this on any forum but this one……
Here is a usual situation I find myself in, like today–treating an endodontic tooth with a undetermined, yet suspicious plugged canal orafice.
Again, this is NO reason to go and buy a laser, but if you have a pulsed Nd:YAG that you are using for another primary purpose….like perio;)….then this might be a useful adjunctive application for this type of selective laser wavelength.
Patient presented with lost crown and incomplete endo. (Patient has LOTS of issues we are addressing). He’s been living with this tooth partially aopened up, but the MB2 or Mesial palatal(?) canal was not located nor instrumented.
[img]https://www.laserdentistryforum.com/attachments/upload/RandyRCT1a.JPG[/img]
Photo for orientation. Upper right first molar
[img]https://www.laserdentistryforum.com/attachments/upload/RandyRCT1.JPG[/img]
[img]https://www.laserdentistryforum.com/attachments/upload/RandyRCT2.JPG[/img]
[img]https://www.laserdentistryforum.com/attachments/upload/RandyRCT3.JPG[/img]
[img]https://www.laserdentistryforum.com/attachments/upload/RandyRCT4.JPG[/img]
[img]https://www.laserdentistryforum.com/attachments/upload/RandyRCT5.JPG[/img]
[img]https://www.laserdentistryforum.com/attachments/upload/RandyRCT6.JPG[/img]
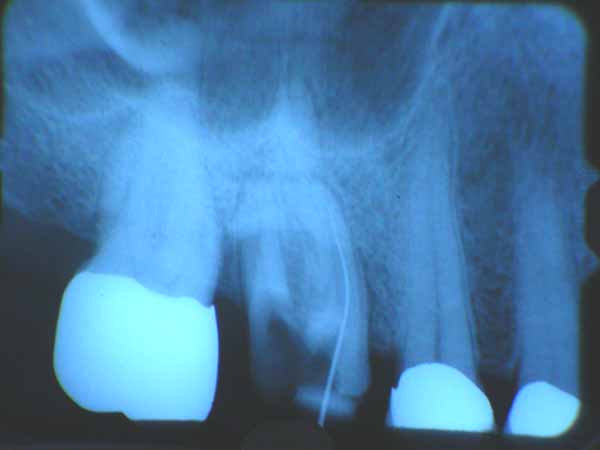
X-ray shows file is aligned in the canal properly and apparently reached the apical working distance.
Bob
SwpmnSpectatorWell hell, if it looks like a nail, use your hammer on it!!!!!
Rod says that getting crapped on after posting on DentalTown is your Badge of Honor. I’ve a good mind to post my one and only Er,Cr:YSGG crown prep case just for the fun of it. That oughta get ’em going!!!!
So at that particular setting, your 1064 wavelength is selecting what was formerly soft tissue in that canal? Now if you cranked up the setting it would bang up the dentin a lot more, right?
Pardon my dumbness but please explain the term EJECTA? That just the stuff coming out of the calcified orifice?
Nice photography. How’d you get so many pics in one post? I thought we could only get three, has that changed?
Thanks and thanks for help with the question on Glenn’s gingivectomy comparison.
Al
AnonymousInactiveBob,
Great pictures – you are really getting the hang of this Photo stuff. It shows very well the whole process – well documented.
To all,
The neat thing is I get to work with this guy!!! I don’t thank him enough in public for the camaraderie and help he is to me. To have a partner that brings out the best in you is tremendous. Thanks Bob!!
Now you all have this kind of “partnership” working for you in this forum. Looking back I think how lonely it was. I don’t feel that anymore.
Robert GreggParticipantHoly Cow!!! Al, you nearly gave me a heart-attack:o I was having a bit of Deja Vu all over again! Geez….you’d better be LAUGHING, cuz I’m biostimulating my heart to get going again!
Ok, compose myself………
Yes, at the 1064nm wavelength, and with the High Peak powers we can get at 100 microseconds pulse duration, 3.00 watts, 10 Hz = 3000 watts per pulse. Whoo aaah!
At about 2mm defocused, that engery will vaporize organic junk, and etch the pulpal floor dentin, but not vaporize calcified deposits (like pulp stones, for example) or remove dentin unless I decrease the “spot size” and get closer to the hard tissues.
At about 1mm defocused at this setting, the calcified tissue will vaporize before the dentin will. When I TOUCH the dentin, it will THEN vaporize, like in my previous post about Class V dentin prep.
Ejecta would be that material that is vaporized (in a gaseous state–such as carbon=smoke), small bits and pieces of what is being broken down, like calcified crumb bits, and dentin pieces. Really anything that is removed by “recoil” from the forward intense pulse hitting and being absorbed in (thanks Del) the substrate, interacting, and causing that substrate to disasociate into component parts, gas and smaller pieces.
See if this image helps:
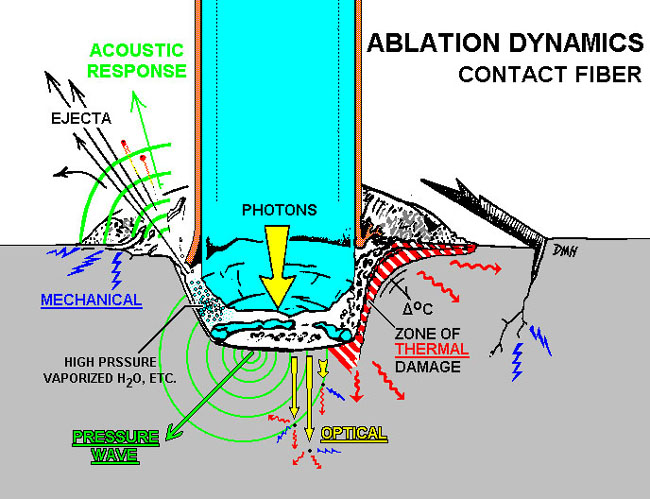
Image courtesy of David Harris, PhD, UCSF School of DentistryAs far as the pictures go, you just have to load them three at a time, unless you are MONSTER PHOTO YODA DUDE like Glenn van As who can create a collage and then just load one or two images.
Bob
kellyjblodgettdmdSpectatorBob – fantastic case! I have a couple of questions:
1) Are you using a dental microscope for this?
2) I have an ADT Pulsemaster 600. I’m not sure what the pulse duration is, but, to your knowledge, does the PM 600 deliver enough energy to do similar selective removal?
Thanks
ASISpectatorHi Bob,
Totally impressive sequence of treatment documentation. I see Glenn’s fingerprints all over this.
Again, tremendously well explained. Your post, like most other ones of yours, requires not just reading, but re-reading and note taking. Thanks again for sharing and educating.
How long did it take you to get down to apex?
Andrew
Robert Gregg DDSSpectatorHi Kelly and Andrew,
Thanks for the very kind comments!
The pulse duration on the Pulsemaster is 100 microseconds. So it will indeed to the job nicely. I will have to check on the Pulsemaster we have at the office to see the best parameters to use. I will get back and post that.
But I hope this demonstrates one point about my purpose in my posts. Rarely do I speak about products or devices or brand names–unless there is a good reason to do so. I try to post in terms of parameters so that others with different devices of similar configurations can see what maybe they can do with the lasers they already have.
Yes, I am using a microscope for this. I’ve been using a Global Surgical microscope (like Glenn’s) for about 4-5 years, so I’m comfortable focusing it, keeping steady, etc while either I or my assistant Liz trips the shutter. In fact, yesterday, I signed a check for my lease payment for about 輾…..(isn’t that thing PAID for by now?!)
And yes, Andrew, you DO see Glenn’s fingerprints on these photos–and Ron S’s too. These guys have been great in helping me improve my image quality.
I took me about as long to get through to the apex as it did to get that great photo of you and your next door neighbors!:cheesy:
Seriously, since I was blocked in that one photo with the file in place (and out of flash memory), I removed the file, continued to lase down until I could see another opening, and placed the file, which went in about mid-root.
Then! I used Bisco 37% phosphoric acid as my chelating agent to negotiate the canal–which was very rough. I use this all the time. It MUST be Bisco though, as other A/E products have silca in their thickening agent. Even still it took 5 minutes or so.
I’ve been do this sort of canal opening for 12 years. And for 8 years I never needed to use a scope to do it. Only with microscope and digital photography is it now easier to accomplish and easy to share visually.
Glad you all like!
Oh, and before I leave this post–Thanks Del for those very kind words. Del was standing at my desk when I started reading his post (and saw my surprised reaction), and was able to thank him face-to-face, but I did tell him it was awefully nice for him to say those nice things. Let me tell you, Del is one incredible talent himself. He was my very first laser instructor before I purchased my first laser in 1990. I’m very lucky to have him as my partner!
His point about sharing and working together in order to learn and improve our patient care is an important one. Del and I are VERY lucky to have one another to work with, bounce ideas off each other, consult, debate, argue (easier to do face-to-face). But this forum, as I have told Ron many times recently (probably to his annoyance now) allows others to do the same via the Internet and this forum. Incredible!!
Bob
Robert GreggParticipantOK Kelly,
QUOTE2) I have an ADT Pulsemaster 600. I’m not sure what the pulse duration is, but, to your knowledge, does the PM 600 deliver enough energy to do similar selective removal?Here are the Pulsemaster’s optimal power parameters for this sort of stuff:
It has a maximum Pulse Energy of 200 millijoules per pulse capability. I prefer more pulse energy for faster dentin cutting, but this ought to do nicely. It also has 100 usec pulse duration, so that’s a very good (short) pulse duration for hard tissue ablation (regardless of the wavelength, I think).
So your Pulsemaster will give you:
100 usec, 2.00 Watts at 10 Hz = 200 mj/pulse and 2000 watts of peak power.
That’s a heck of a lot more and BETTER energy delivery than I EVER had when I was using the dLase 300 for 8 years and opening up these kind of canals:
150 usec 3.00 watts 20 Hz = 150mj/pulse = 1000 watts of peak power.
Peak Power = pulse energy (.150 Joule) divided by pulse duration (.000150 seconds) = 1000 watts peak power.
So, Kelly, you have TWICE the energy per pulse as I ever had for 8 years!!. So you can do this nicely…
Thanks for the question.
Ooops! I almost forgot. Don’t forget the importance of the fiber diameter and its effects on the energy density!
If you have a 400 micron fiber, its energy density (intensity) is 159 Joules/cm2. With a 320 micron fiber the energy density is 249 J/cm2 which is 1.56 times more energy density than with a 400 micron fiber.
(So now you know my little secret for endo and pulsed Nd:YAGs. I always use a 320 micron fiber)
So for hard tissue ablation, you can increase your effective energy density, simply by switching to a smaller fiber diameter. If you don’t have a 320 micron fiber, I can get you one.
Bob
(Edited by Robert Gregg at 7:48 pm on May 30, 2003)
kellyjblodgettdmdSpectatorBob – Thanks so much for the walk-through. This really helps. I’m pretty good at math, but it’s been a while since Physics class! I have a patient coming in soon that I’ll try this out on. I was doing RCT on #31 (through a PFM) – found the MB and D canals, but couldn’t find the ML. Perhaps using an Nd:YAG in this fashion would be helpful.
I do have a 320 micron fiber; I also have a 220micron fiber. Would this be too focused or intense?Could you tell me a little more about your scope? I used on while I was a resident at the Veteran’s Hospital here in Portland – I loved it! I am wondering what magnification and gadgetry you have on it.
Thanks so much for your insight and assistance.
Kelly
AnonymousGuestQUOTEIf you have a 400 micron fiber, its energy density (intensity) is 159 Joules/cm2. With a 320 micron fiber the energy density is 249 J/cm2 which is 1.56 times more energy density than with a 400 micron fiber.
Bob
(Edited by Robert Gregg at 7:48 pm on May 30, 2003)
Bob, you lost me with this one.
The area of the 320um tip is only 25% smaller so I guess its not a simple proportion calculation.Where do those numbers come from? Is this assuming a certain power input?
Thanks
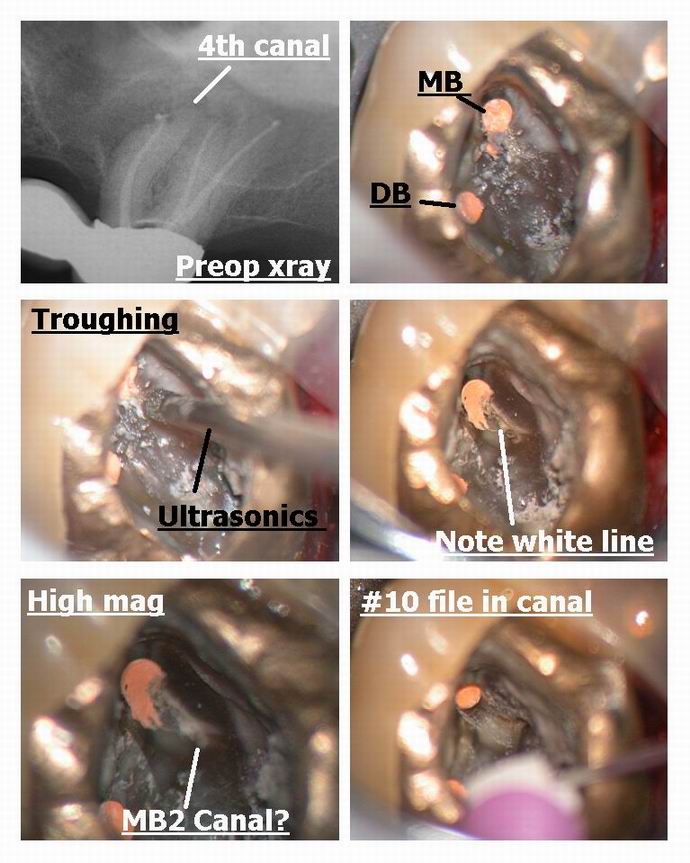
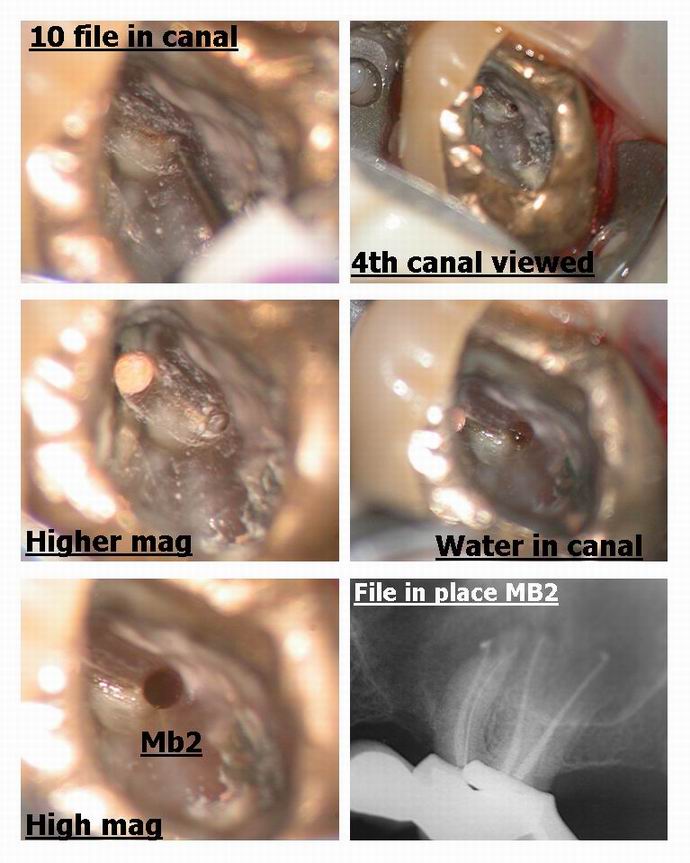
Glenn van AsSpectatorHi Bob: I just wanted to point out that uncovering 4th canals is easy with the scope ( bob used it too) and here is a case not using the laser which shows this principle.
My associate did a nice endo on this tooth but I noticed a root unfilled ( the MB gutta percha isnt centered in the root meaning another canal exists) so asked him if I could look for it (hes putting a new bridge up there).
On opening it up …….I troughed with an ultrasonic tip from the MB down to the palatal and a little mesial from a line connecting the two canals.
What is interesting is that the MB2 is often located mesial to the line drawn from MB to P canals and when you uncover it, it goes first lingual and then mesial before curving back towards the MB canal……you can see this clearly on the photos.
There is ALWAYS a white line connecting the two canals as can be seen in Bobs photos and in these photos.
The SCOPE is ESSENTIAL for finding these. I found another 4th canal on a maxillary 2nd molar on thursday on a failing case and have 2-3 times found 5 canals on cases in lower molars.
THe white line is made clearer by the Nd Yag or ultrasonics so you can locate the missing canal……MAGNIFICATION IS ESSENTIAL.
Hope this non laser post helps……
Glenn
ASISpectatorHey Glenn,
Very nicely done. Once the 4th canal is located, was it patent in terms of ease in sliding the #10 file down?
I often find that a path finder or #8 file is needed in addition to piezoelectric(I use a Booster P5) crowning down. The scope is a real illuminator though. What a great tool!
Andrew
Glenn van AsSpectatorHi Andrew…….this wasnt the first file in but the third.
I used a #6 first til it could get as far as I could get it, Then #8 and # 10 just to get a little hole opened up.
THere is a reciprocating handpiece attachment called the M4 made by Kerr that can attach to my Technika ATR and I use that to open up the coronal half it takes regular K files in the M4 and opens it up reciprocating 30 degrees either way in a watch winding motion. I dont go to the apex because it can elipticize the apex but it helps open up the canal without risk of seperation and in addition once I open up the coronal then I can often get a small file to the apex …….
Use Glide or EDTA to help lubricate as well.
Vision is the key though.
Glenn
Robert Gregg DDSSpectatorHi Kelly,
The 320 would be easier to use in the beginning, but the 220 (200?) would definitely have greater energy density and allow you greater access deeper into the canal. But you really need to be careful and lower your energy because that is really intense.
I used a Global Surgical operating microscope, fitted with an X-mount from Global, with a Nikon CoolPix 4500 attached to that.
It has the magnification AND the coaxial illumination that allows for awesome visibility that indirect illumination alone just can’t give.
Glenn van As here is the expert on magnification & photography and can tell you lots more….
Ron,
I know what you mean. It can get VERY confusing when calculating energy density with quartz clad fiber optics.
The simple answer is I got these numbers off the ADT Pulsemaster 600 IQ energy density chart. But calculating them can be problematic.
The formula is ED = Joules divided by surface area. Surface area is Pi (3.14) times the radius squared.
So if you have a 320u fiber the surface area calculaton that was apparently used by ADT is apparently .8123. Divide 200 millijoules by .8123 = 246.21445.
Now the problem comes in when you are trying to extrapolate this to other fiber diameters, and then you find out that is does NOT correlate. The reason for this is that…..get ready…..a 320 micron fiber may not really be 320 microns in diameter. Huh?:confused:
Ok. Depending on the manufacturer specifications, there will be the quartz core diameter of say 300 microns, then a quartz coating of say 10 microns, followed with a polyimide (correct spelling) coating to protect the quartz cladding of another 10 microns. So the accurate way to calculate is using the actual CORE diameter–NOT the core diameter PLUS the resin and quartz outer layers. But is this what ADT did? I don’t know, and I need to check their numbers. Which is why I said I needed to check their numbers!?:confused:
Does that make any sense?
Thanks Glenn.
Good point. Great photos as usual!
I also use ultrasonics with various endo tips. In fact, I used the ultrasonics right after I got blocked in the last photo to trough the canal open wider. Then I went back with the Fr Nd:YAG to clean out the dentinal debris and get a clear view.
But that assumes we always know WHERE to trough. Sometimes the canal can “hide” in places unexpected, and the coloration and even the normal anatomical landmarks are missing.
The pulsed Nd:YAG has the optical capability to differentiate between different densities and chemical components of intra-pulpal materials.
So using the Fr Nd:YAG to identify, then open up the canal using instrumentation of choice (ultrasonics), then going back with the Fr Nd:YAG to clean out the dentin debris is a nice combination. That and how magnification makes it easy to view can really be an awesome enhancement.
You are very correct about the way these MB2 canals go one way, then track back another, too.
Also, ultrasonics–like rotary instruments–are “indiscriminate” hard tissue cutters. They also create a lot of debris that covers the area I am trying to view. With a pulsed Nd:YAG laser, I can remove tissue one to three pulses at a time, keep the viewing field completely free of debris, and watch the progress as it is taking place, giving me much more control, access, and visibility than even when I use ProUltra ENDO ultrasonic tips (from Tulsa Dental).
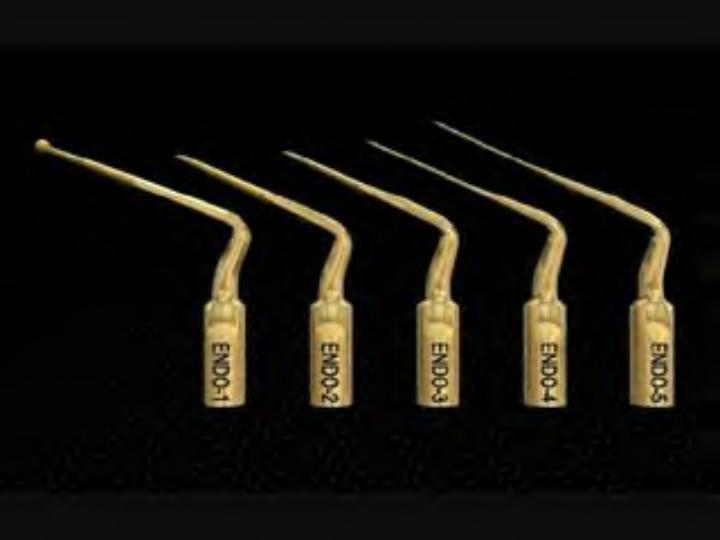
So, I love using the laser to locate, the ultrasonics tips to cut quicker, and the laser to clean out the debris from ultrasonics in an alternating fashion. Combining the two technologies together with the microscope makes for an awesome combination–and lots of fun too.
Thanks everyone for a great discussion!
Bob
AnonymousGuestQUOTEQuote: from Robert Gregg DDS oThe formula is ED = Joules divided by surface area. Surface area is Pi (3.14) times the radius squared.
So if you have a 320u fiber the surface area calculaton that was apparently used by ADT is apparently .8123. Divide 200 millijoulesby .8123 = 246.21445.
Bob
The 200 millijoules is the assumption that I missed.
Thanks for the explanation.
-
AuthorPosts
