Forums › Erbium Lasers › General Erbium Discussion › Role of magnification in laser dentistry
- This topic is empty.
-
AuthorPosts
-
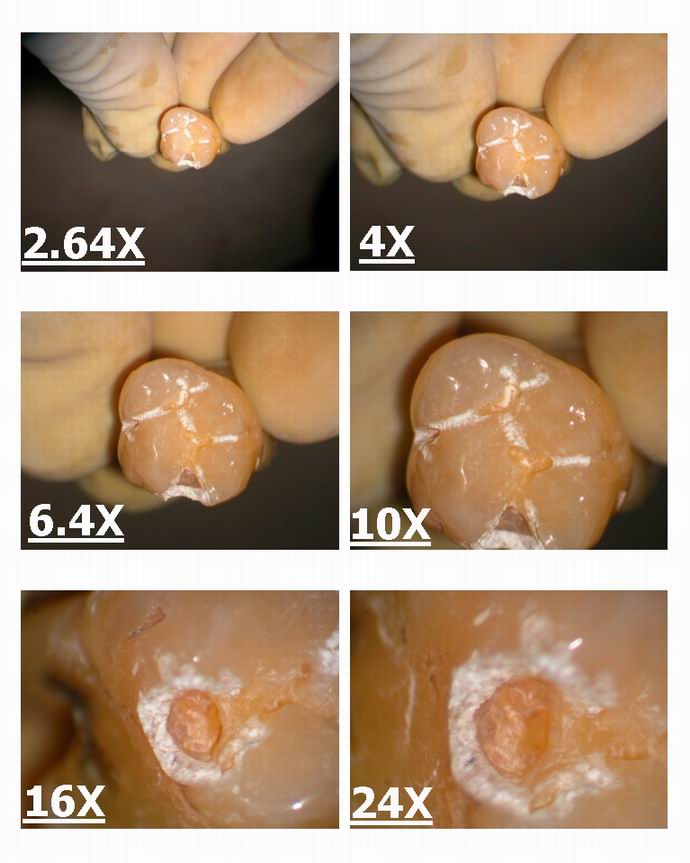
Glenn van AsSpectatorHi Folks: I have gone on record as saying that magnfication is very very important with lasers and I am going to post some photos and some cases to emphasize this concept in this thread.
Here is the first one showing the six different steps of magnification with my microscope and what you see on the same extracted tooth laser prep as the magnfication increases.
You can see the detail of the etch etc…….
You can see how the value of the scope for decay removal and for checking out how efficiently you are cutting is.
Glenn

2thlaserSpectatorGlenn,
This is the greatest set of photos for a scope I have seen yet. Global should hire you! Man, if this doesn’t make you want one! Great images, great photo’s, which makes for great dentistry, you are to be commended. Magnification is SO VERY IMPORTANT when using not only a laser, but everything we do as dentists, is truly micorsurgery. I have said for years, let a general surgeon use a drill, and let’s see how good he is. US with our skills as microsurgeons, really ought to rely on the equipment that will give us the best vision, to see those real small area’s we work in. Even at 4X, but 6X and up is so incredible.I have always had a facination with microscopes, from high school, to dental school. I can’t wait to have the one in the office. Soon I hope, as the $$ alows! Take care, great stuff!
Mark
Glenn van AsSpectatorThanks Mark: I had a dentist from Belgium in the office yesterday and it made me appreciate what I have. He practices in a group practice of two dentists in roughly 300 sq. ft in Brussels. 2 chairs total, 1 for each of them and they have a tiny waiting room and a tiny area for sterilization. They have 2 scopes though (Zeiss) and are cutting edge dentists.
I took the photos to show him the different mags.
Here is part 2 of the thread. After looking at old photos I noticed this tooth done 2+ years ago where there was a tiny shadow on the mesial pit of an upper molar. Easy to miss. I etched the rest of the tooth for Fissure sealant and prepped the small area with a 400 micron tip.
Filled that with flowable but going to start packing with hybrids with some modified tools I am going to make after attending a lecture yesterday.
The dentist was showing how tough it was to get bond into some of these micropreps we are doing with the scope and that you get bubbles……..
Interesting stuff, I am just so used to it that I forget sometimes.
Glenn
[img]https://www.laserdentistryforum.com/attachments/upload/Resize of Pg 1 layout of micro occlusa_p1.JPG[/img]
[img]https://www.laserdentistryforum.com/attachments/upload/Resize of Pg 1 layout of micro occlusa_p2.JPG[/img]
joegarciaarSpectatorGlenn:
The difference between working with or without magnificacion, is the difference between seeing and not seeing.
Thanks to share your excellent works !
How what do you verify that the decay cavity this free one?
Thanks
Robert GreggParticipantGlenn–
Beautious!!
Poetry in photos!
Bob
-
AuthorPosts
